Leaderboard


Popular Content
Showing content with the highest reputation on 02/21/2017 in all areas
-
So, and this project was completed.


 7 points
 -

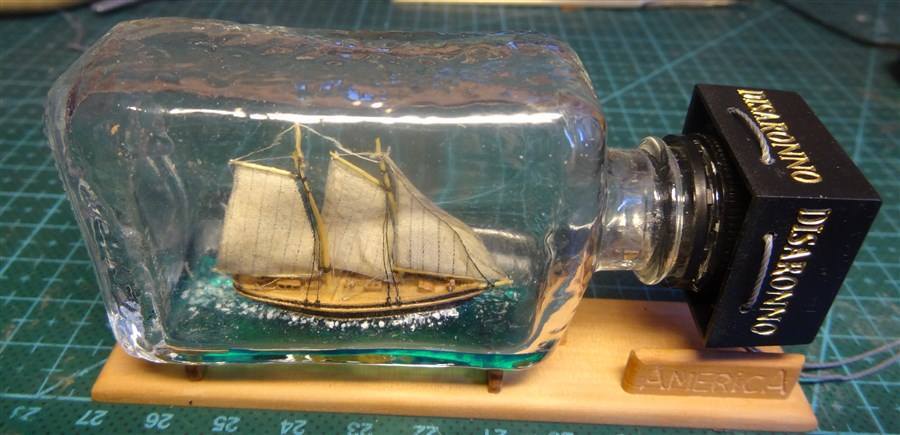
Scharnhorst 1/1800
Landlubber Mike and 6 others reacted to joe100 for a topic
Here are some build photos of both Scharnhorst and Kongō. It's hard to see the details without the paint, black plastic and all. Few views of Kongō from my other thread:7 points -
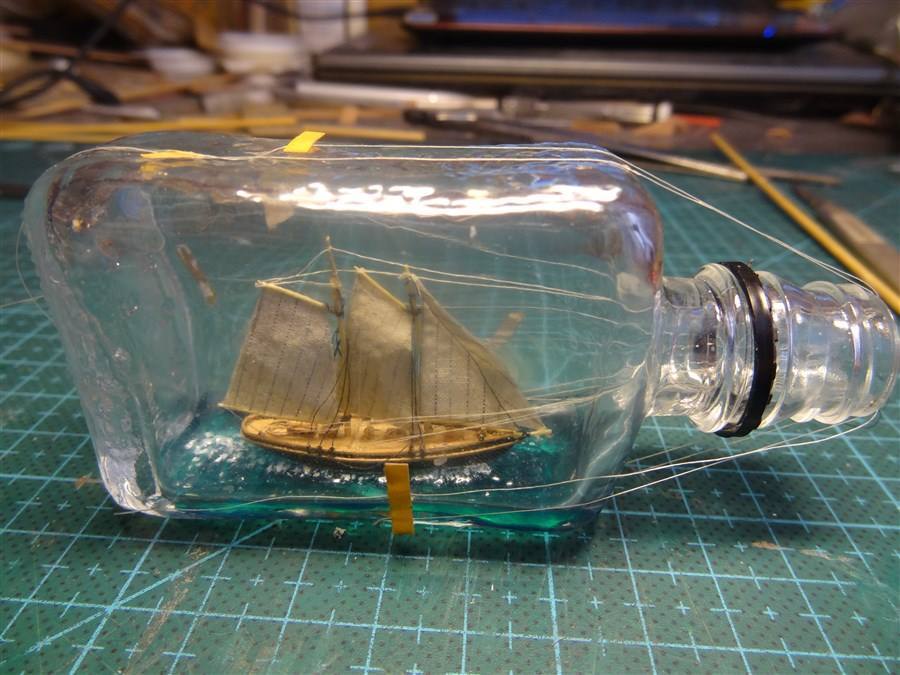
Then I needed only to fix the rigging with glue and to cut the ends of the threads, to install the bottle on the stand and to close the cork.


 4 points
 -
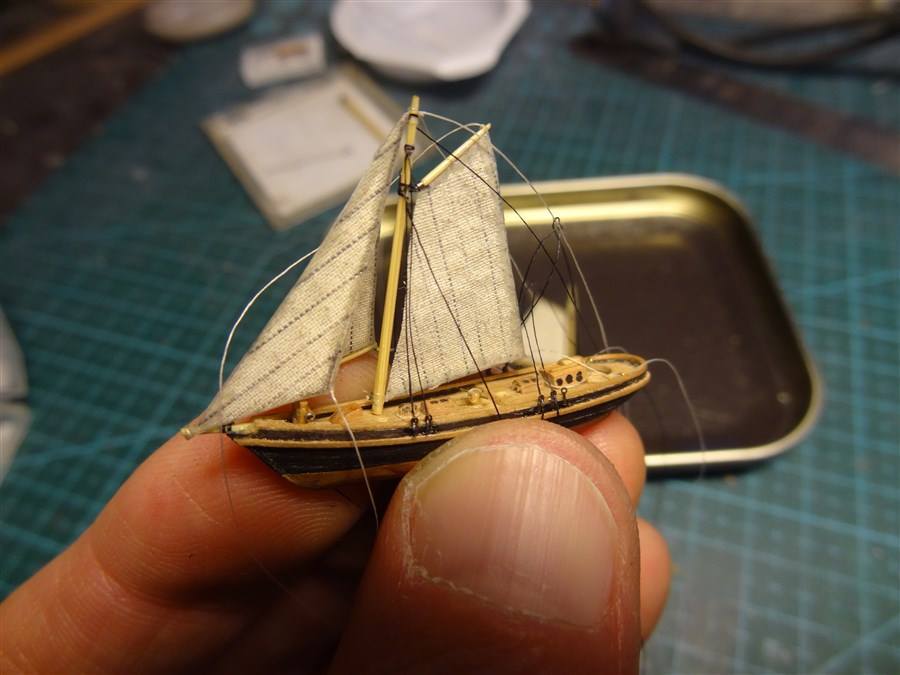
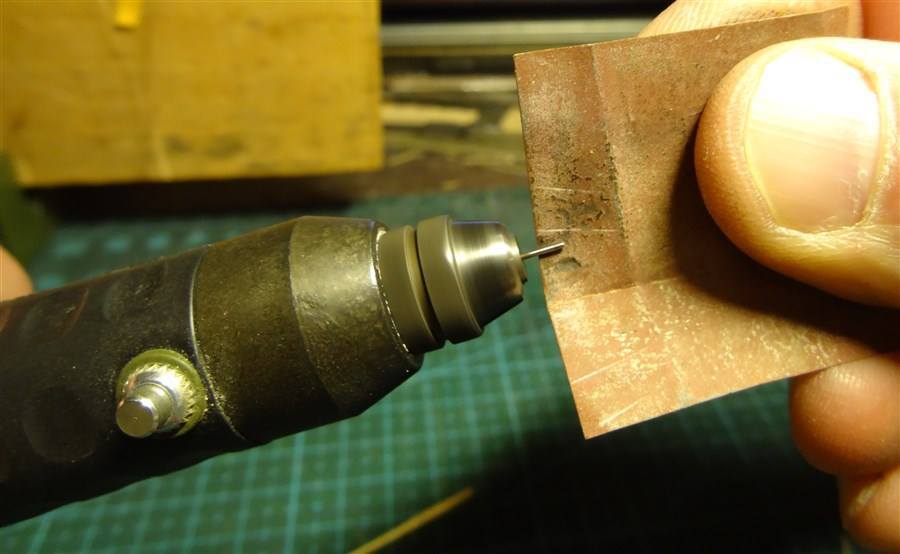
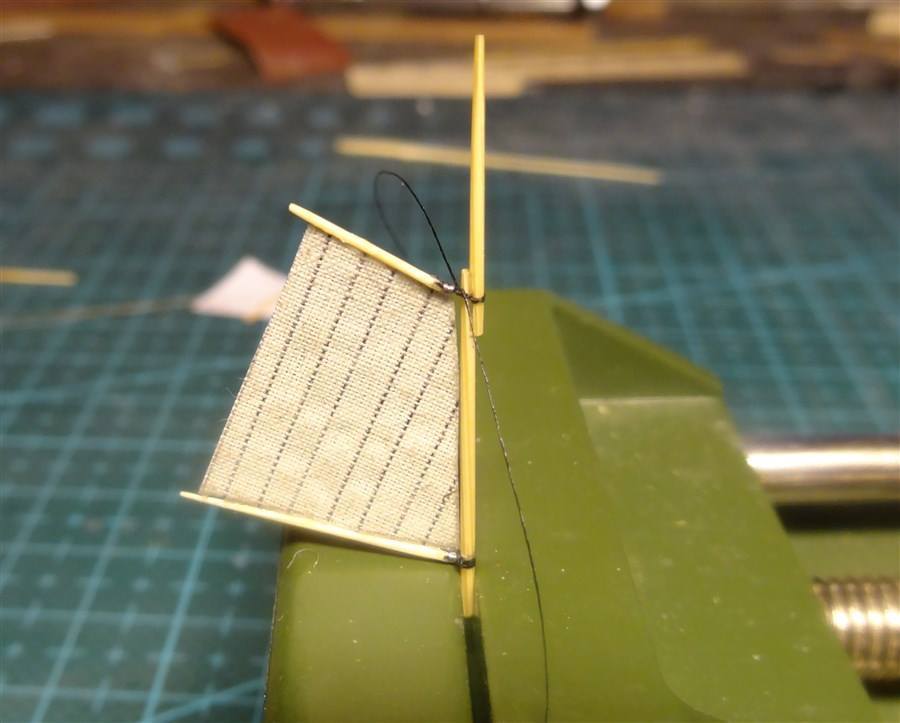
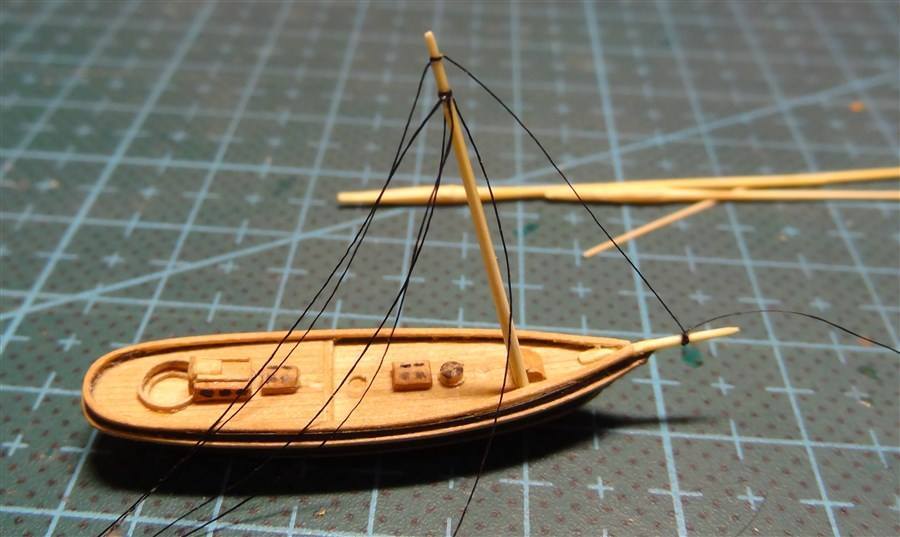
In this project I used two different ways to install masts.

 3 points
 -
So, I prepared the model for its movement into the bottle.


 2 points
 -
In this project I have used the epoxy resin with the addition of a color pigment for the making the bases of the sea. In addition, I used white acrylic paint to simulate foam and transparent acrylic gel to simulate waves. The whole process of making the sea looks so: epoxy - a little white paint - gel - a little white paint - a little gel.

 2 points
 -
Now it's time to pour a little of sea in a bottle ))

 2 points
 -
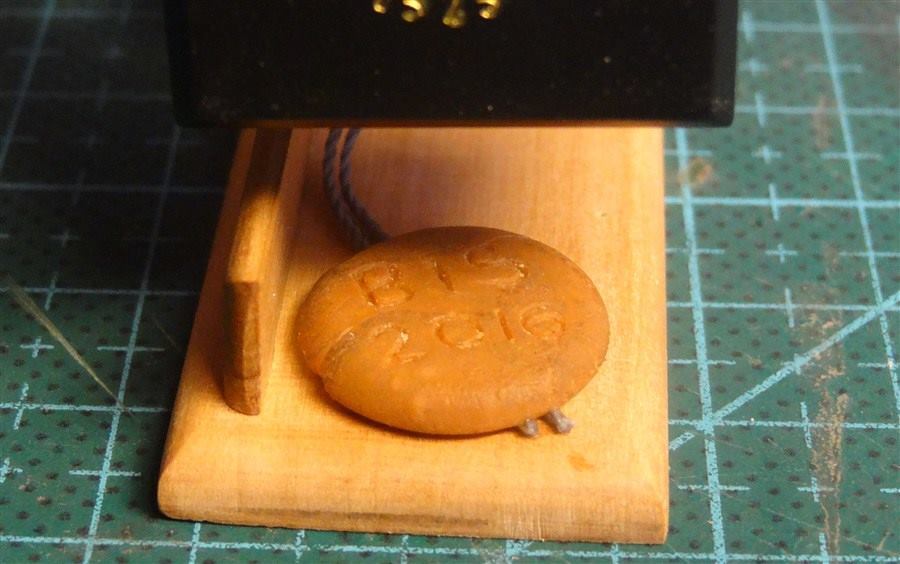
Then I made the stand

 2 points
 -

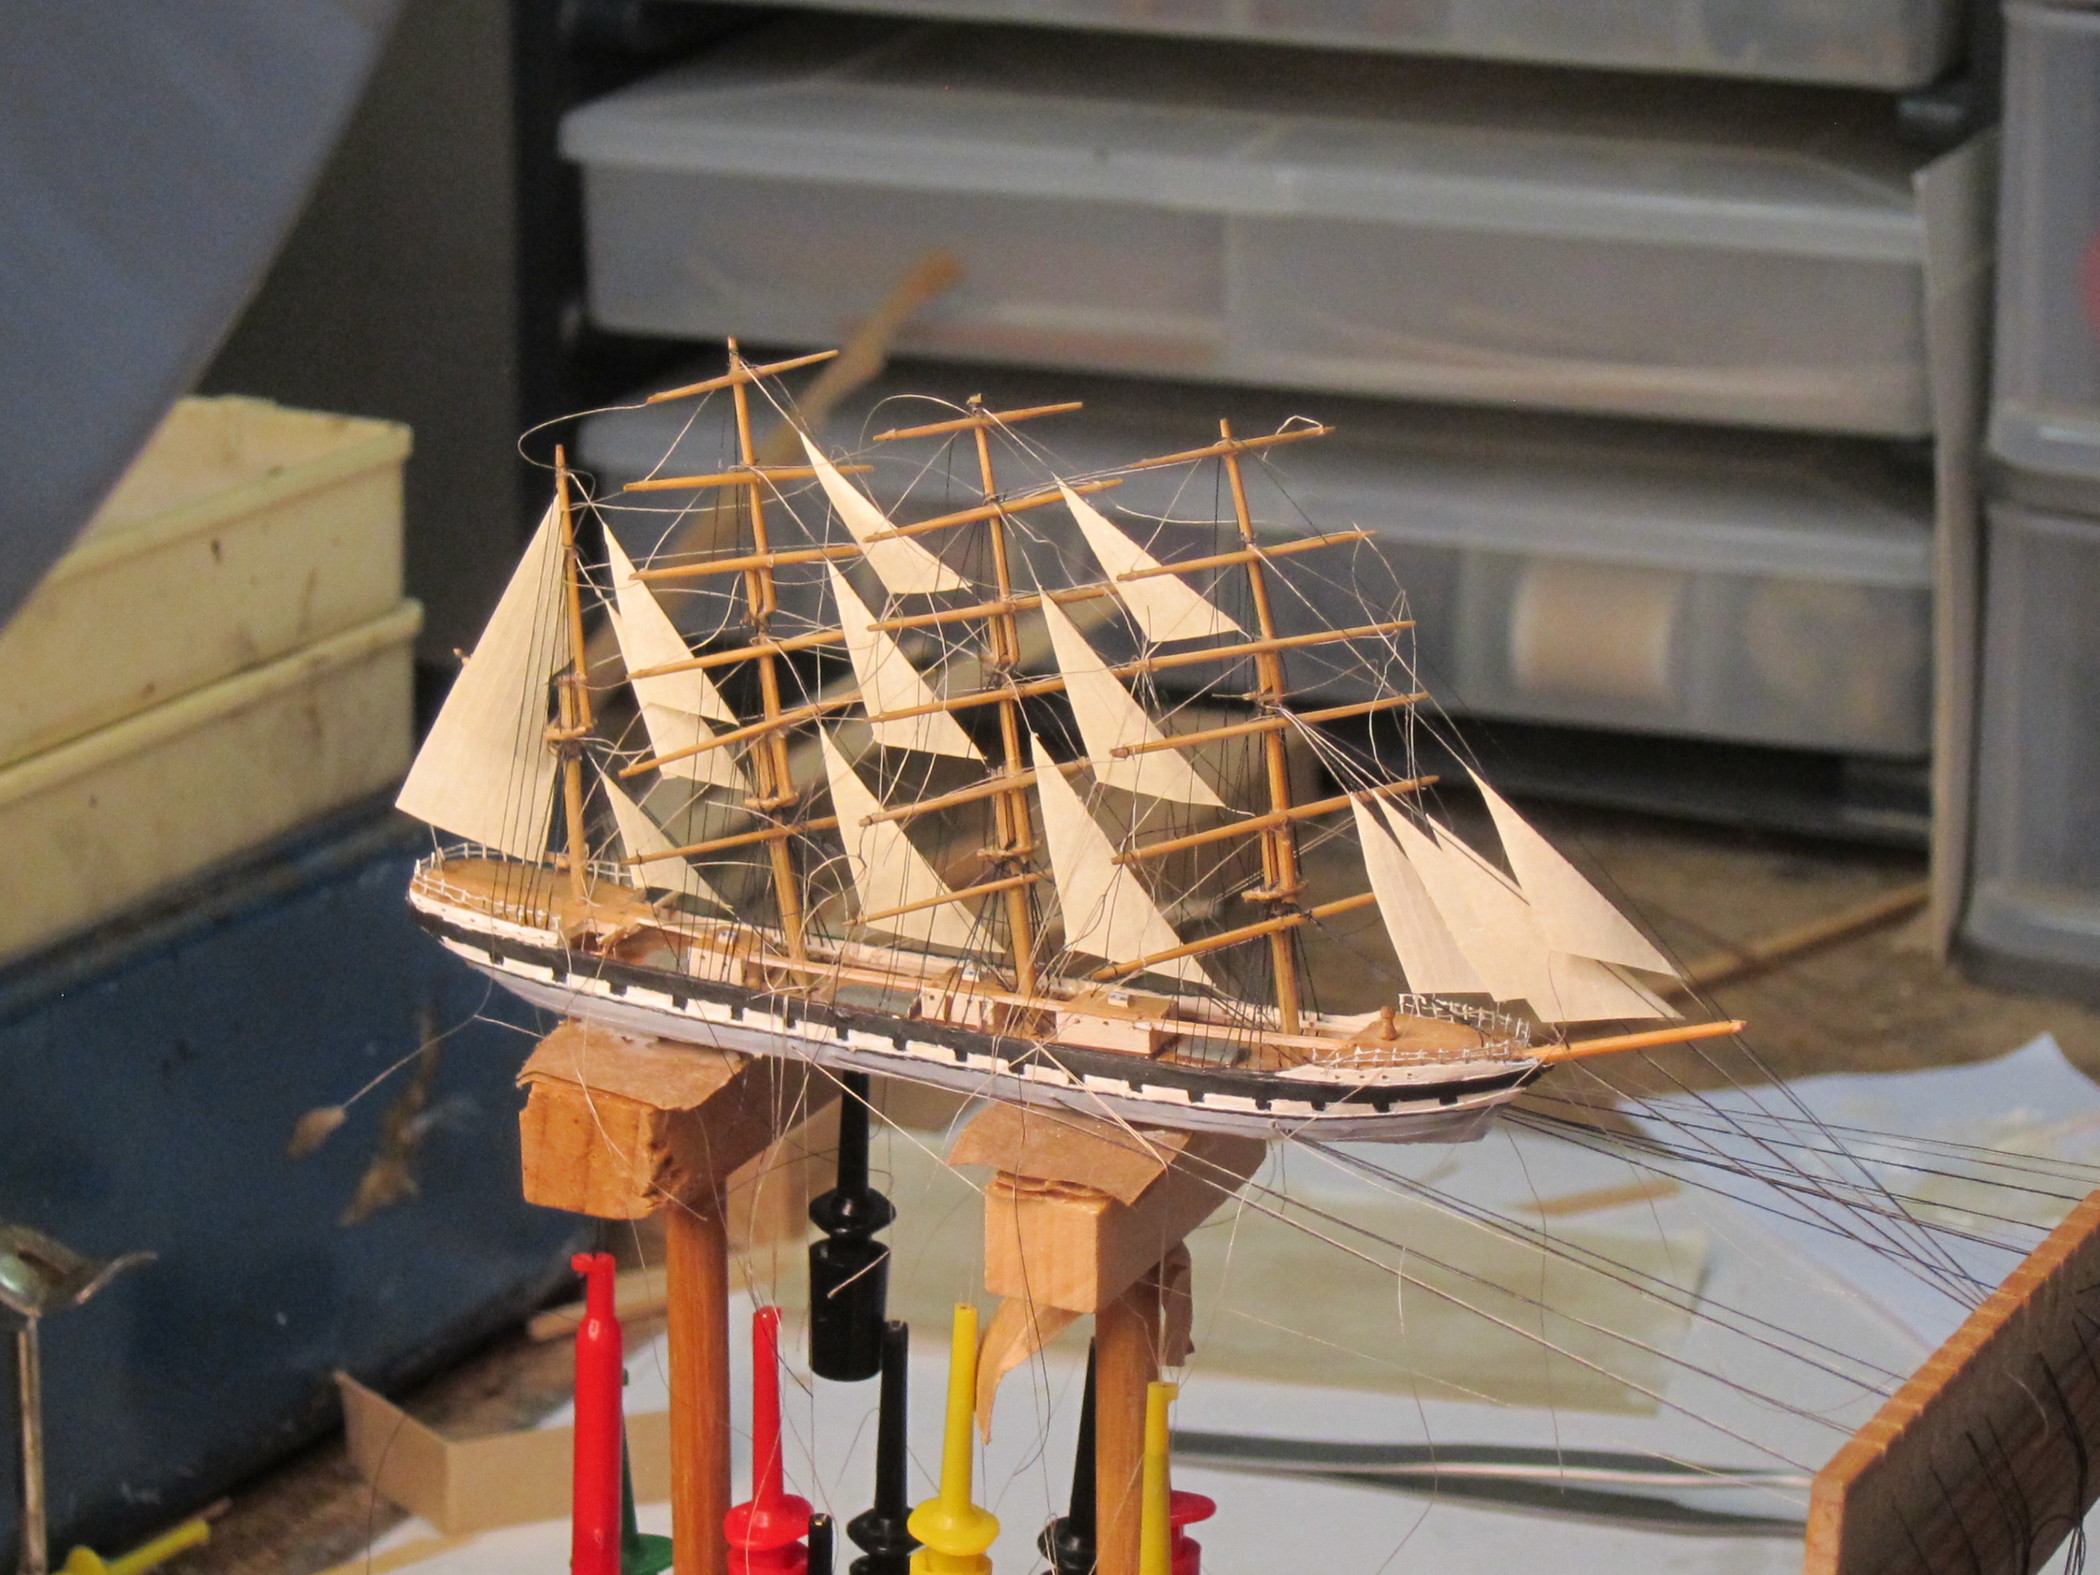
Schooner AMERICA Scale ̴ 1/800
James w rogers and one other reacted to IgorSky for a topic
One more test
 2 points
 -
Then I have checked all details of the rigging and masts


 2 points
 -
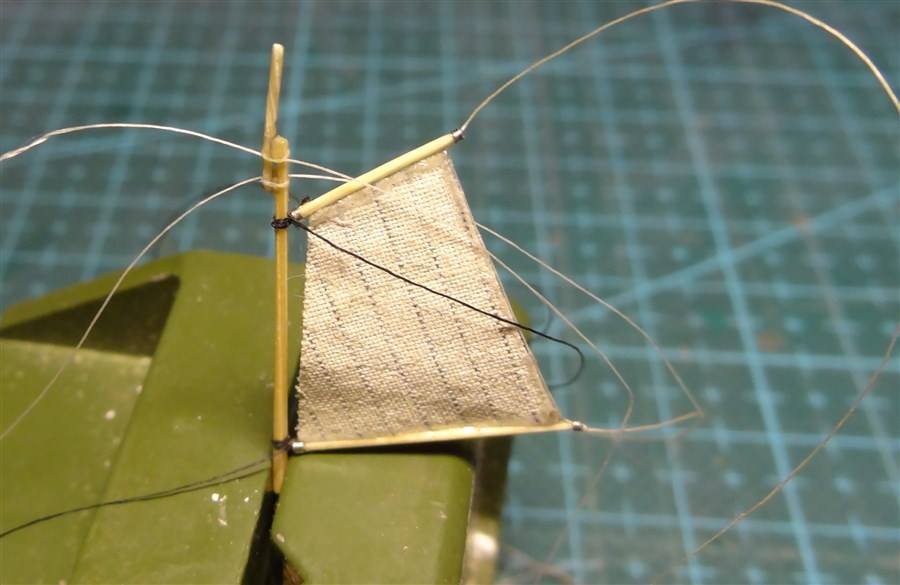
Now I had to make the sails. I started with the making of the sail for the back mast.


 2 points
 -
Schooner AMERICA Scale ̴ 1/800
James w rogers and one other reacted to IgorSky for a topic
Then I made the parts of masting and gunwales


 2 points
 -
Hi DSiemens I'm glad you like it . Igor These are images Miroslaw Szeib http://www.szeib.pl/. And this is my collection of his paintings.2 points
-
Scharnhorst 1/1800
Landlubber Mike and one other reacted to joe100 for a topic
Thanks! The lower hull is styrene with a wooden core, upper hull is 3d printed high definition acrylate. The rest is brass, styrene, stainless etc. Rigging is Modelkasten monofilament.2 points -

Archibald Russell
lcrcar reacted to Alex Bellinger for a topic
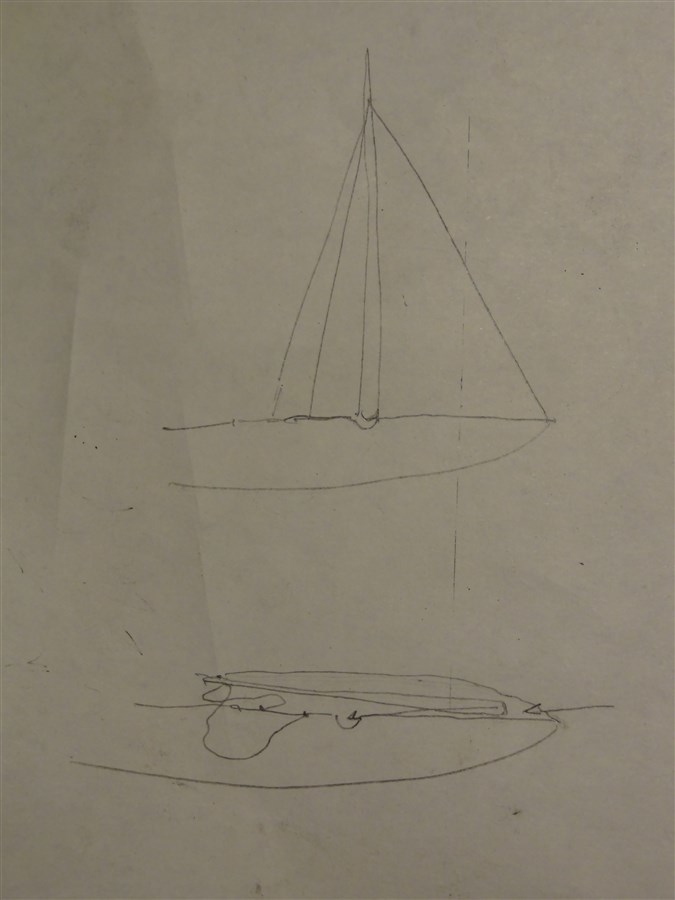
Archibald Russell The four mast steel bark Archibald Russell was built in 1905 in Greenock by Scotts Shipbuilding and Engineering Co., and was one of the last of her type to be built on the Clyde. Built for general trade, she was 291 feet long and had a beam of 43 feet and displaced 2385 tons. She was owned by John Hardie & Son of Glasgow. After years of carrying a variety of bulk cargoes around the world, she was sold to Captain Erikson who operated a fleet of sailing ships, primarily in the grain trade from Australia. Eventually she was broken up in 1949. This ship was unremarkable in design or history, but exceptional as a well -documented and handsome example of her type. Underhill created a very detailed set of plans, including one sail plan with yards lowered and another with sails set. Bjorn Landstrom added a careful drawing of her hull and deck furniture as well as a color sail plan in his popular 1961 book, The Ship. Clive Monk followed Underhill and added her plan to those in the appendix of his 1954 Windjammer Modelling. Best of all, Edward Bowness made the main subject of his thorough 1955 Four Masted Barque. The second edition included information on a number of similar barks, but it grew out of a detailed guide to building an accurate model of the Archibald Russell. She has come down to us as the leading example of this kind of ship near the end of the sailing ship era. She is also well suited to ship in bottle building. Her long shape and complex lofty rig are well suited to a typical wine or whisky bottle, filling the space handsomely. In the early days of the craft it is easy to imagine many of the craftsmen, though perhaps not knowing Archibald Russell specifically, were certainly familiar with a ship or ships just like her. My own model started sometime in the mid-1990s, as a project for one of the ship in bottle classes I was offering those days. It was clearly intended for advanced students and I was not entirely surprised when I got no takers. The plans are my own drawings, taken from the plans in Bowness’ book, and made back in the days when I still believed this extra step was essential for accuracy and developing a familiarity with the ship. Now I am more skeptical about errors possible in this work, especially from careless draftsmanship. But in this case I felt my plans were accurate enough, and the templates were made from copies of these. The model itself starts as a pine core, and bass wood is an excellent alternative. I’ve heard cedar is also good, and I look forward to trying it. The lower hull is hollowed out for the rigging lines, done with some fine chisels and smoothed with files. Although having invested in many fine files over the years, I often return to the files from an inexpensive keyhole set purchased over 30 years ago. For larger scale models I would normally plank the deck with thin strips of wood, but at this scale, approx. 61’ = 1”, there is little point. The bulwarks are added on and eventually I learned working with multiple strips of wood for these makes it easier to effectively get the right sheer. A thin strip is glued horizontally inside the bulwarks to serve as a rigging railing for the shrouds, backstays and sheets. Made of pine, this strip went in very neatly but was later to cause me much woe. As an experiment I went over the outside of the hull with thin strips of paper to represent the hull plating. I liked the results and this did make painting the hull easier, especially the lines along the hull sides. The painting was still time consuming, taking a number of times going back over the strakes and false gun ports to get it as neat as it should be. There are some fine masking tapes out there, particularly the green “frog tape”, but so far I’ve only gotten little results using them at this scale. The deck furniture is varied and involved. There are three houses on the main deck and another, the chart house of the poop. The poop and fo’c’sle are joined by a catwalk that runs over the main deck houses. The hatches have peaked covers. All houses and hatches have brown “booting” around their bases, which was represented by this strips of paper painted the correct color. All portholes are simply simulated by pin holes in the wood. As often before, I lose interest in photography until the rigging starts, although there are a number of things that must be done before it can begin. The railings need to be added to the poop and fo’c’sle. They are made up of nicrome wire, 0.008” for the stanchions and 0.004” for the railings. The former are set into holes at the edges of the decks and the latter superglued to them as they are bet around the stanchions. This is not the best method, I’m sure, but it is the best I’ve managed so far. I’ve tired various jigs to create these railings off the hull but have had two ongoing problems; keeping the tension on the wire even as it is applied to the jig and finding an adhesive that can be depended on. Perhaps those with more experience in this technique can enlighten me. There is also a light railing along the catwalk but I did not seriously consider attempting this. Even the finest materials I have would still be too large for this feature and it would be a considerable challenge to make it without the results looking out of proportion. Furthermore, this railing would be so light a delicate it would probably not survive the rigors of rigging the model, let alone the bottling. Even the more robust fo’c’sle and poop railings took enough of a beating through the completion of the model as to make me wonder whether I shouldn’t have figured out a way to add them later in the process. Among the other things necessary to get done before starting rigging is, of course, making the masts and spars. At first I was going to use hinged “Hinkley” masts because I was afraid masts without hinges would not come back up among all the deck furniture. Unhappy with how my hinges were turning out, I decided to chance unhinged masts, and that turned out to be just fine. As usual, all masts, spars, tops and booms are of bamboo. Again as a concession to the scale, I did not attempt the topgallant spreaders. I find it is easier to rig in topmast and topgallant shrouds before starting any rigging to the hull. All rigging was a combination of fine thread and fly tying silk. The lower shrouds and stays are of the thread and the upper rigging is all fly tying silk. All running rigging is a light brown fly tying silk. It seems simplest to start from the foremast and head aft. Lines rigged in separately, of brown fly tying silk, are rigged in below the stays to support the staysails, and I usually tie these in first to help keep the mast in place and because these would usually be rigged in below the shrouds. Next come the lower shrouds themselves. The thread for these is always waxed. After years of doing this I finally realized the line used to rig the lower fore shrouds can be run after through the hollow underneath the hull to become the main shrouds, and on the become the mizzen and finally jigger shrouds. Similarly, the fore back stays, of black fly tying silk, can become the main, mizzen and finally jigger backstays. Therefore, all standing rigging running abaft the masts can be rigged in using just two lines, one of thread and the other of fly tying silk, making it much easier to make adjustments as needed. One of the difficulties arising from this is having to spend an extended period working with exceptionally long lines. Beading needles are an enormous help in this work with one major exception. I found these needles in three sizes, #s 10, 12 and 13. As most folks know, the higher the number, the finer the needle. In spite of being told a number of times these needles will pass through a hole drilled by a #80 drill, experimenting with these needles I found the hole for a #13 had to be drilled by a drill at least as big as a number #78. Both #s 10 and 12 needed holes at least as large as a #74 (!). Unfortunately my delicate railing inside bulwarks could not take much of the punishment of being drilled by bits this large. I had to repair sections of it a number of times. A further complication is the thinness of the #13 needle eye. Only with great difficulty can any line larger fly tying silk be threaded through this eye, and if you do succeed, that eye with the doubled thread will require a hole larger than the #78 to get through it. So much of the threading of these shrouds and backstays was done without the benefit of these needles and took a good amount of time and patience. Having to do this again, I would try to build a sturdier inboard railing. There is also a braided beading needle which is an alternative. My testing found it needed a hole drilled by a #76 drill. Once the standing rigging is all in I usually added in all fore and aft sails. These are easier to set before the braces go it. All staysails have sheets which are threaded through holes in the rail inside the bulwarks but are not secured until near the end of the entire rigging process. This is because the positions of all the masts shift and I was reluctant to commit a stays’l sheet until I felt more certain all was where it should be. This is the beginning of a time consuming and subtle process as the lifts and braces get tied in. Ships like this bark look best if all the mast rake alike and there is a clear uniformity throughout the rig. The braces have slightly more leverage between the masts than the shrouds, backstays and stays so they tend to draw the masts together. This is what I think of as a “corset” effect and can easily wind up with a fore mast raking conspicuously too far aft and a jigger raking too far forward. To try to maintain control and adjust as needed, I glued the braces on the lee side of the yards and only tied them on the weather side, leaving them free to be loosened or tightened. It also left them free to slip off the end of the yard from time to time, It took a number of days of carefully retying to finally get the balance I was after. This is why the nearly completed model is a chaos of loose ends for so long.


 1 point
 -

Mast handling tool
James w rogers reacted to DavidB773 for a topic
Hey, all. Here’s a tool for putting masts on our SIB’s. It lets you guide a mast through the neck of a bottle horizontally and then rotates the mast to vertical to its place on the hull and then releases it. Basically, it’s a small diameter brass tube with a steel wire in it that is attached to a link that pivots. I don’t intend to write a novel and I don’t think anyone wants to read one here so I’ll try my best to explain. It’s probably obvious that moving the wire causes the link (wood material) to pivot. The pivot is a straight pin that was bent to a 90 and epoxied to the brass tube. The two barbs on the link are clipped ends of pins. The sticky backed foam is stuck to the barbs and the blue tape helps. The foam has a slot for the mast. An important part is what I would call the release wire. It creates tension with the foam until removed. An important part is after the mast is guided in and the wire is pulled slightly to rotate the mast to vertical and then placed in the hull, the tool needs to be released. This is a critical time because the mast is somewhat attached to the hull and positively to the tool at the same time. A careless movement could cause breakage. Here’s what to do: attach a thread to the loop on the release wire to pull the wire out. The tool will immediately disconnect from the mast. In the pics, note the range of the rotation that be had; only 90 deg. is basically needed. The first pic shows both sides of the link and the opposite end. If you make one for yourself, I would stick with the small brass tube simply to avoid putting weight on a delicate mast after it’s placed. The release wire does the holding so the foam needs to be soft. I'd be glad to answer any inquires and thanks for taking a look. David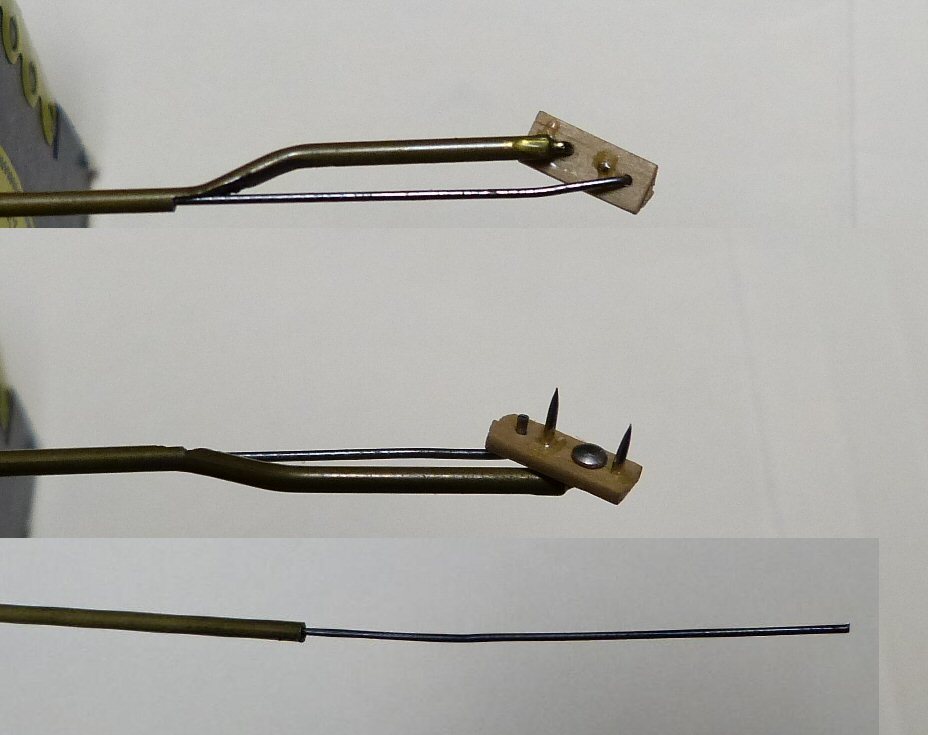


 1 point
 -
Here’s my W. H. Dimond SIB in progress. The hull is 4-3/4” long 1-1/8” wide and in two sections. It will go into a bottle that has a neck opening of 1-1/16”. To secure the ship to the bottle, the hull will be glued to a wood strip base and this strip will be glued to the bottle using silicone. This is going to be my method of inserting the two-section hull inside the bottle: attach one hull half to the base and then place it inside the bottle only just past the neck. The other half of the hull will then be added. The halves have short pegs for alignment. The lines for the rigging will come out below the bow where there’s a groove carved in the base strip. All this is because I want to keep track of and avoid pinching these lines. The three masts are pegged. They will go in one at a time, back to front, of course. I made a tool that holds the mast horizontally for passing through the neck then rotates vertically. Then after the mast is guided into its hole, the grip on the mast is released. Intrigued? I’ll post some photos showing how this works shortly. I haven’t been sure of an accurate the paint scheme to follow until I’ve discovered an online photo of a model that’s at the San Francisco Maritime Museum's library. So the cabins will be changed to white. This is my first SIB so I’m not going to attempt creating sails. I think the beauty of these vessels can be realized docked or in full sail. Thank you! David

 1 point
 -
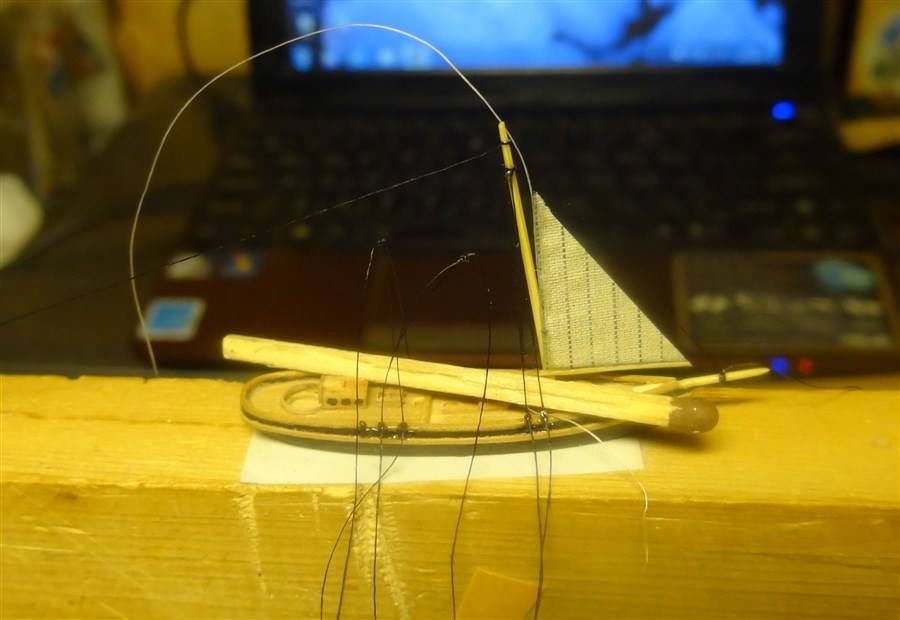
MiniSIB - Typical boat of Mediterranean Sea, 1/200
Landlubber Mike reacted to IgorSky for a topic
Hi to all! Another of my small projects. Once I have seen the photo of the model boat, which was interesting me. I have wrote to the author of the model and he told me that this boat is a typical for Sardinia the southern Mediterranean area Andalucia. So, I decided to build the model of this boats in a bottle. 1 point
 -
Scharnhorst 1/1800
Landlubber Mike reacted to joe100 for a topic
Greetings, I recently finished the German battleship Scharnhorst 1943 in 1/1800 scale. Upper hull is 3d printed, lower hull and the rest of the details scratch built. The base is just temporary since the custom case was still on order. I will take some updated photos as she's now full mounted. Next up is a full hull ocean liner, NDL Europa, my favorite of the 30s greyhounds. Simultaneously I'm going to be working on the Japanese heavy cruiser IJN Maya. Maya will be 1/1800 scale and Europa around 1/2000.1 point -
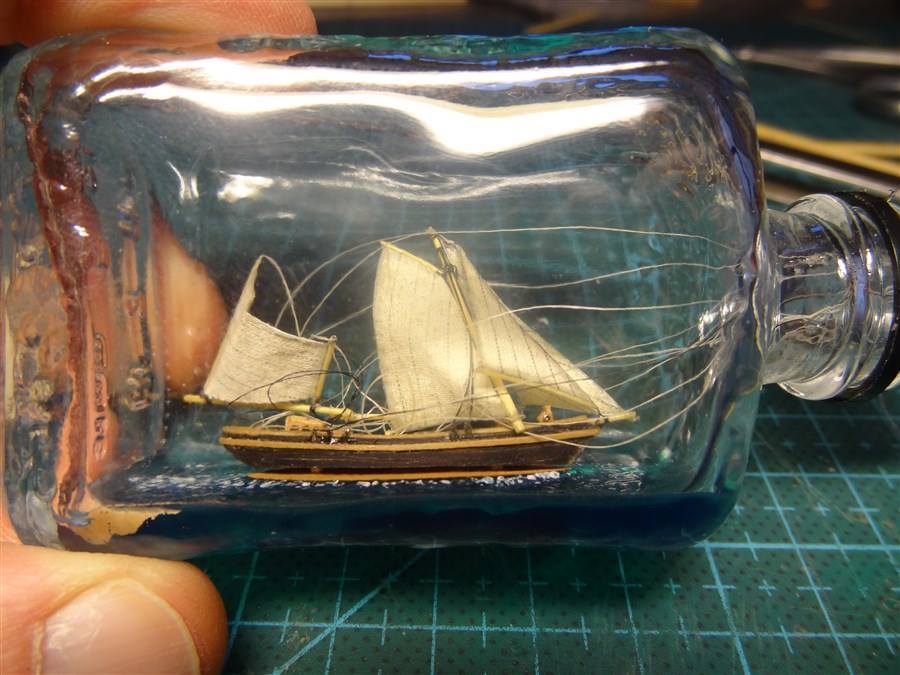
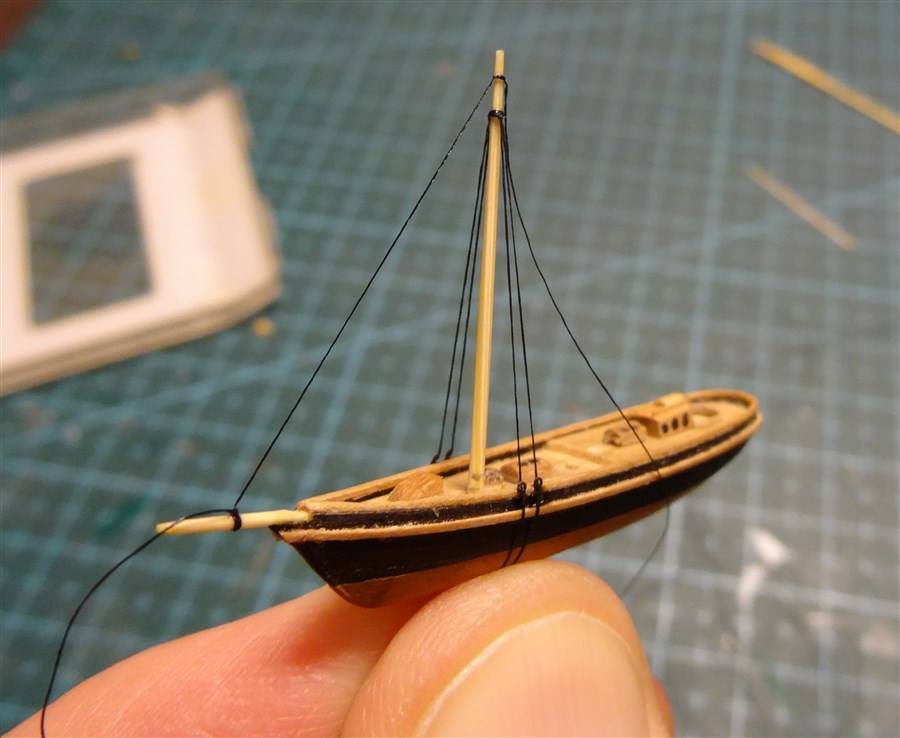
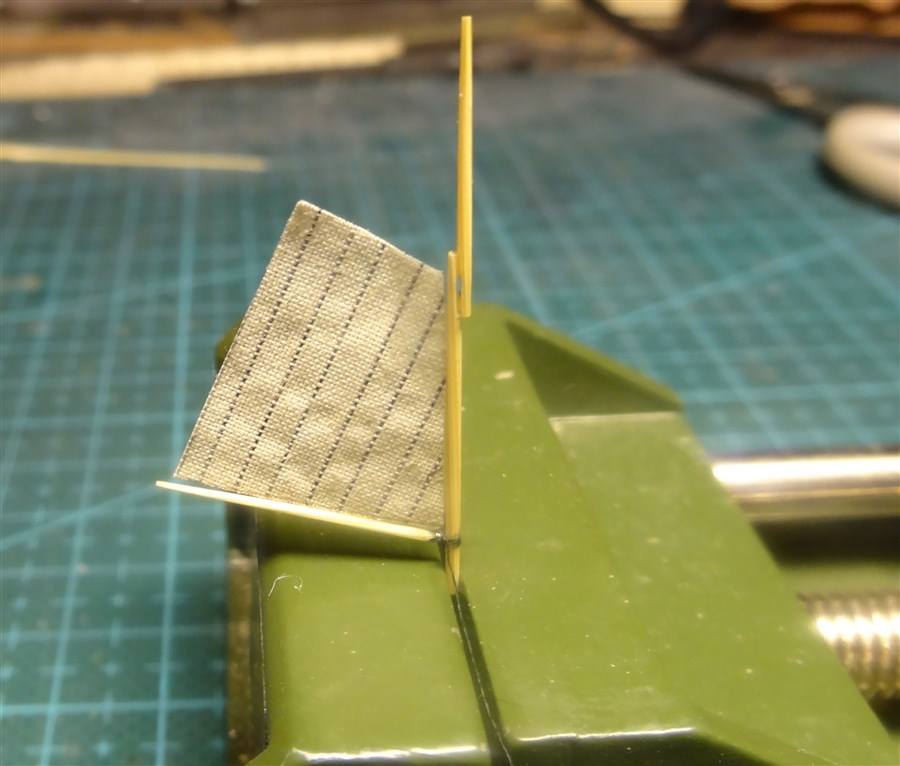
Installing the main-mast
 1 point
 -
I had placed all parts of the models into bottle. Then I had installed and glued in its place upper part of the hull, I had set the foremast, but now remained the most difficult part - I have to install the main-mast and pull all the rigging )


 1 point
 -
1 point
-
Finally I made the mainsail
 1 point
 -
Then I made the front triangular sails.


 1 point
 -
Then I have prepared the cloth for the manufacture of sails and the blanks for gaffs.


 1 point
 -
Then came the turn of the second mast


 1 point
 -
Schooner AMERICA Scale ̴ 1/800
James w rogers reacted to IgorSky for a topic
The next stage - the masts and the standing rigging. So first - foremast.


 1 point
 -
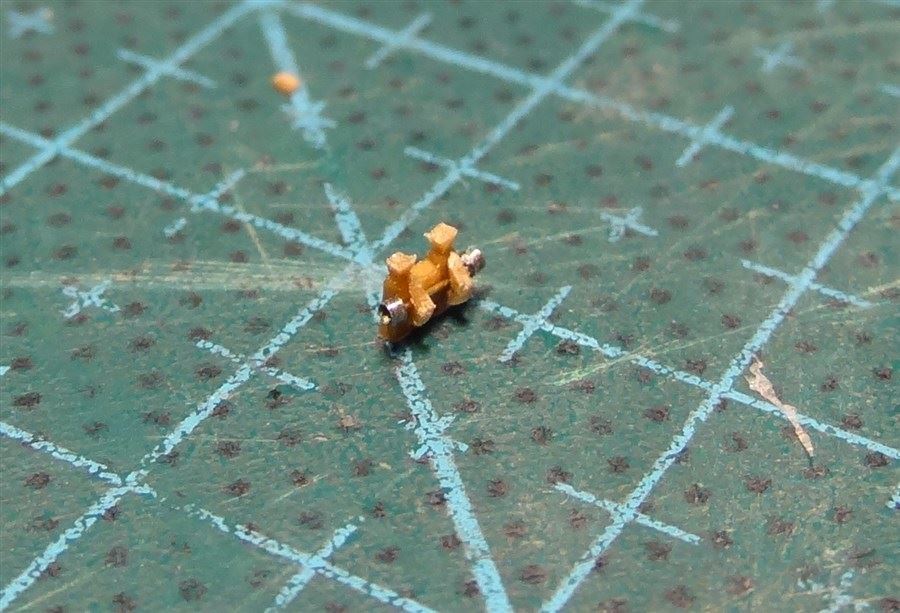
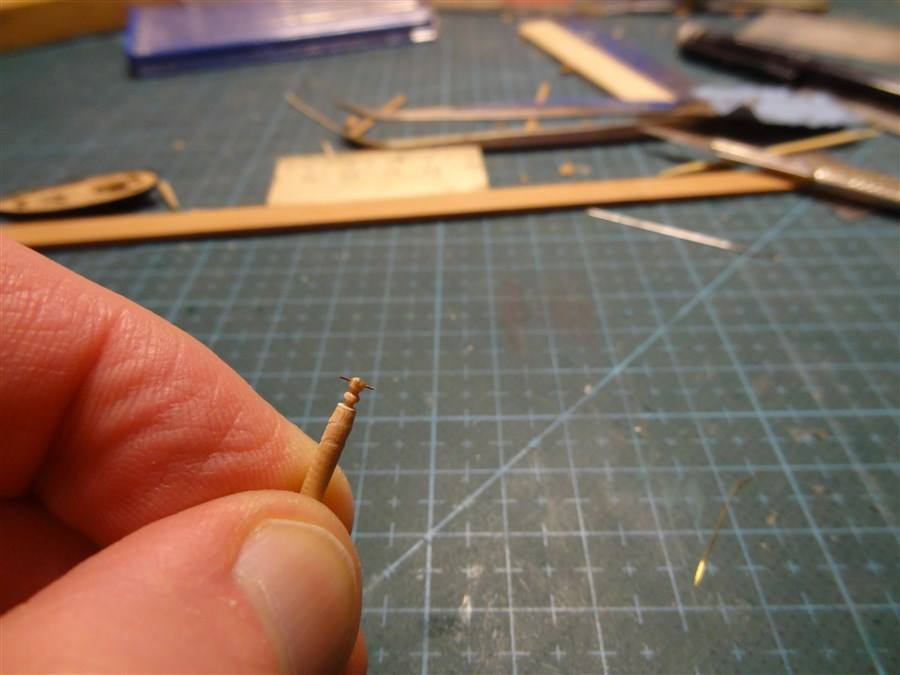
The next step is making one more the small detail - the nose winch


 1 point
 -
Schooner AMERICA Scale ̴ 1/800
James w rogers reacted to IgorSky for a topic
Next detail - capstan


 1 point
 -
The next update - making of deckhouses


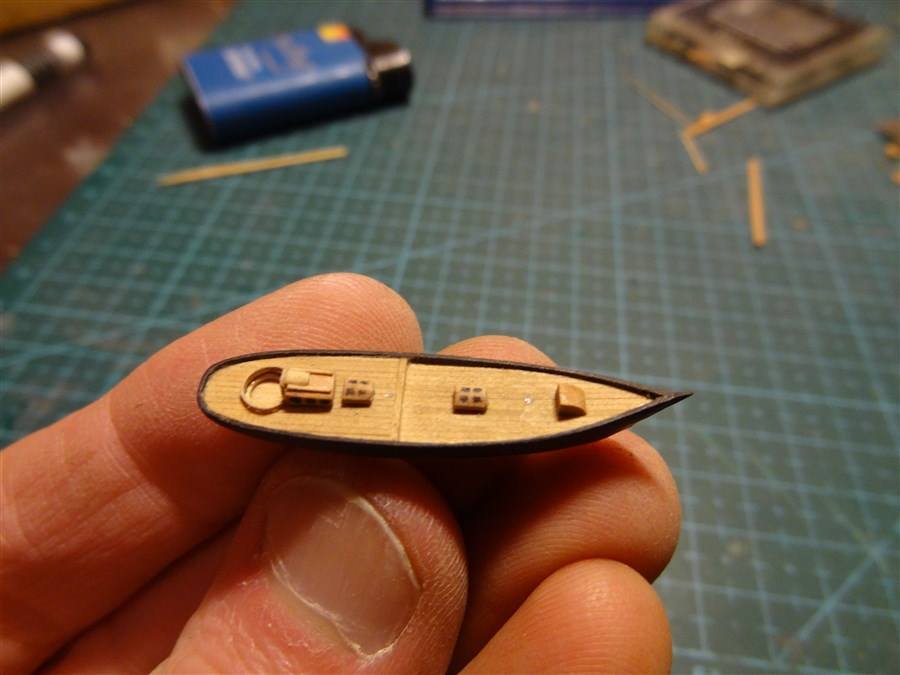
 1 point
 -
Schooner AMERICA Scale ̴ 1/800
James w rogers reacted to IgorSky for a topic
Almost at the same time I did the lower part of the hull.


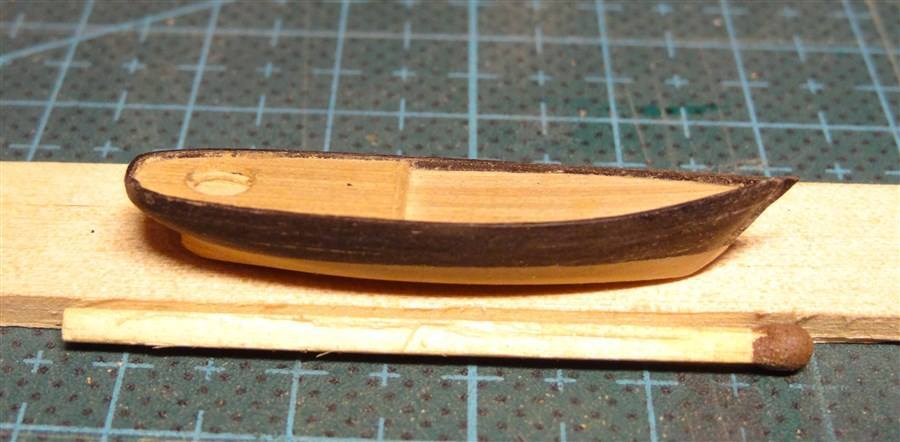 1 point
 -
Hi Artur! Very nice wirk! It seems that this place is quite popular for artists - https://www.google.ru/search?newwindow=1&q=Зима&tbm=isch&tbs=simg:CAQSlQEJPRYudpDux2oaiQELEKjU2AQaAggLDAsQsIynCBpiCmAIAxIo4gqFBNUKyBfNF8oXowvMF8kX4wrcKsMi1j7XPv03vTflOMci2yq6OhownZ2CnqC9qTBE4REDfKewCYiaxZUaqYcFbk-VEgMAKKgUc1qCRtNzW8rrnxcLMU8xIAQMCxCOrv4IGgoKCAgBEgQ4JOMoDA&sa=X&ved=0ahUKEwjLhdi4qp7SAhVjLZoKHUWqDhoQ2A4IGigB&biw=1280&bih=907#q=Зима&tbm=isch&tbs=rimg:CcLJeA7Jem_18IjiOVq6_1C26TsjWR7bi2yf-6cwg8Z9An4Xb70sMZHLeXM3-LmDSNYugM_1Bv8SF7n7XUumXNwcQz0aCoSCY5Wrr8LbpOyEY92GfCnIPsvKhIJNZHtuLbJ_17oRj3YZ8Kcg-y8qEglzCDxn0CfhdhF_16A1A0RWgYyoSCfvSwxkct5czEc_1vX2P9nQfBKhIJf4uYNI1i6AwR4TzoQ9YjivUqEgn8G_1xIXuftdRF_16A1A0RWgYyoSCS6Zc3BxDPRoEY92GfCnIPsv Are you going to make the winter river too? Best Regards! Igor.1 point
-
Very cool job, Joe100! Congrats!1 point
-
Oh yeah, versatile stuff1 point
-
I'm going to have to get into styrene.1 point
-

Archibald Russell
Bernard Kelly reacted to DSiemens for a topic
Absolutely beautiful work. I wish I lived closer I'd take your advanced class in a heart beat. Regarding the oil on the sails there is one technique I've found and used which I find works well. In the old video of George Fulfits ship in bottle building he used saranwrap to cover the sea while putting the ship in the bottle. He also put some between the sails to keep the lines from snagging on the yards. The only trouble with it is you wouldn't be able to get the ship secured to the sea until the masts were erected. This is my preferred method any way so it works for me. Using your wire and duct tape idea would also work with the saranwrap method. Since the plastic is so thin it's easy to remove and protects the sails well.1 point -
Archibald Russell
lcrcar reacted to Alex Bellinger for a topic
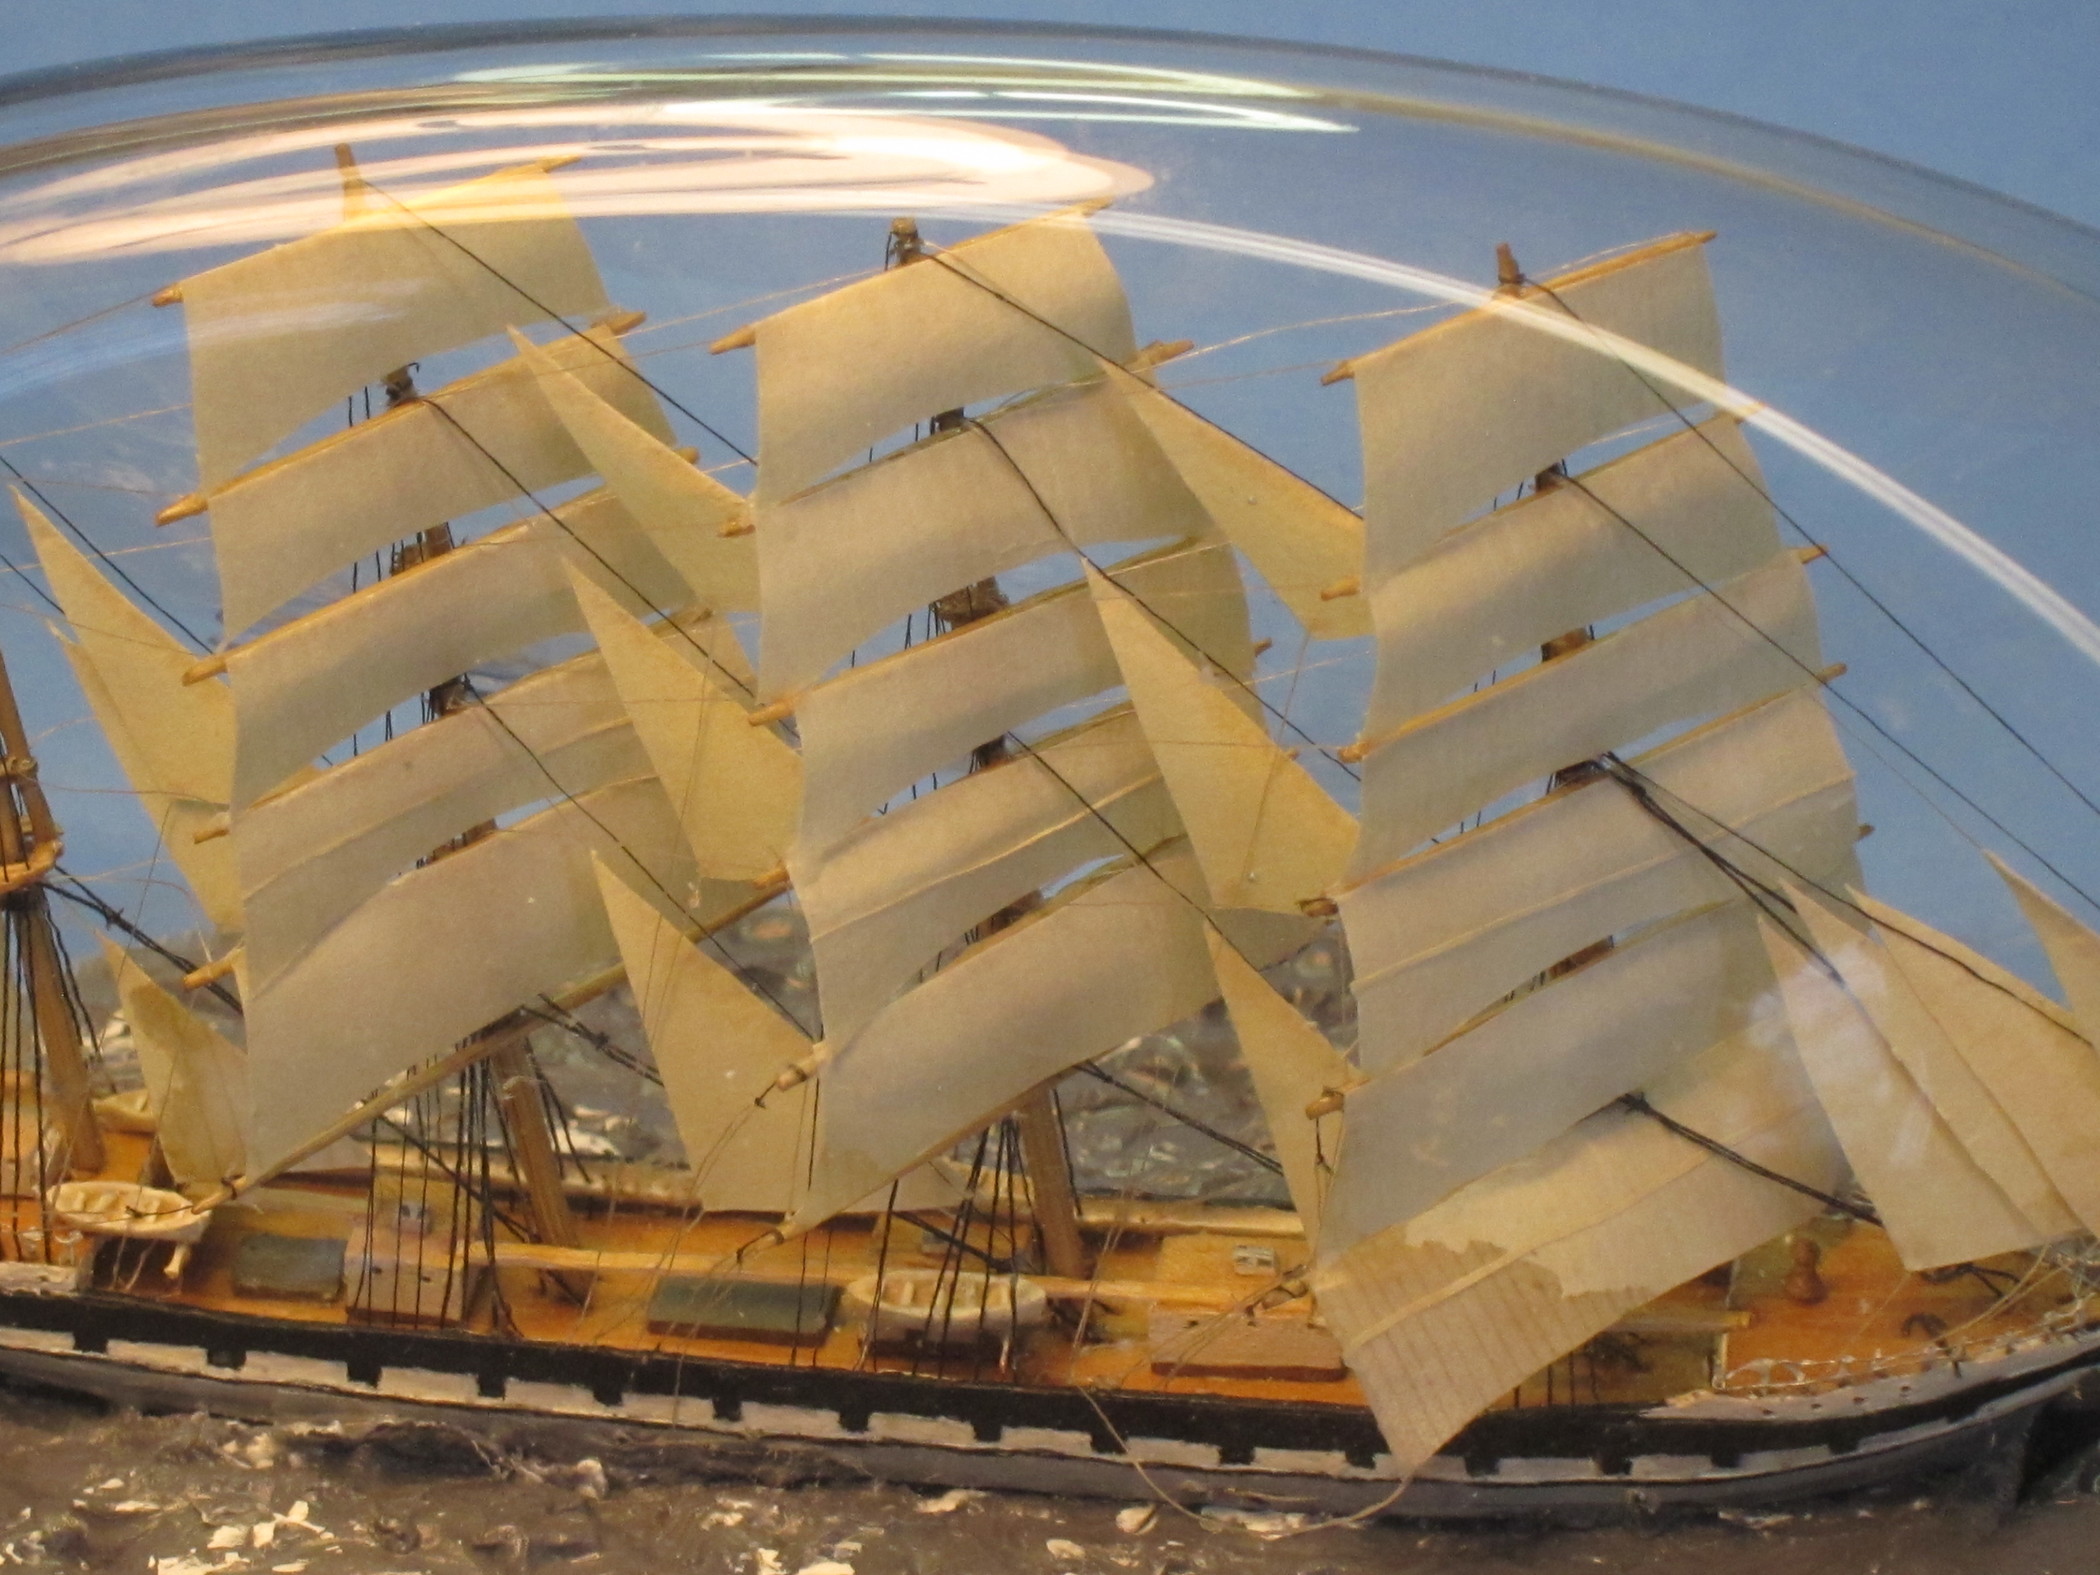
Finally the square sails could be added. The material for the sails is much like what I have been using for years, a light weight paper colored with a warm gray magic marker. Instead of using the point of a pin to scribe the seams or “clothes” of the sails I returned to an older idea and used a hard pencil. Seams made with the pin tend to crack and split, and at this scale that could be quite a problem. In spite of using a #9 pencil, the seams, only on the weather side, look a little too heavy to me. The final details are the boats and anchors, and I almost always put these off until the last. Good miniature boats can be nicely made of paper but I’ve had no success with that technique at this scale. There are carved out of pine and have paper thwarts. Like the catwalk railing, these details may be more a challenge at this scale than they are really worth. But not having them no would look worse, I think, so the attempt is always made. The bottle that renewed my interest in this project is a hand blown bottle by Michael Magyar from Cape Cod. It is obviously intended to recall the classic pinch bottle, but happily is slightly longer and better accommodates a long ship like this bark. My friend and fellow ship bottler Gerry Ross knows Michael and sent one of these bottles as thanks for getting John Guley to complete a prototype of a kit Gerry was trying to develop John and I decided to give it to Charlie Ryan, another ship in bottler, but John got in touch with Michael about ordering more. After some back and forth we ordered 10 and split the order between us. For the first of my five I bottled the 5 mast two topsail schooner Carl Vinnen. The glass clarity is wonderful but the inside shape creates a couple of problems. The narrow corners inside are a little difficult to fill with putty and then get a smooth sea surface. It takes going back over a number of times. The corner on top, above the ship, is so narrow I was concerned whether the upper yards would have been braced around far enough for them to fit in this limited space. The indent on the side of bottle underneath the ship protrudes so far into the bottle the putty base above it is very shallow. But with the deep corners, the bottle takes a surprising amount of putty. But there was an unexpected bonus. Two air bubbles on the port side wound up acting as miniature magnifiers The bottling took about a week between getting her in and feeling all was well enough finished. Most of the difficulty was not having a secure enough bond with the putty sea, so that as I increased the tension on the stays, the model tended to head back towards the neck. I got over this by fashioning a section of coat hanger wire bent to hold the hull in place and taped to the outside of the bottle neck with duct tape. It is the first time I ever tried this, and I wonder if I’d recommend it. But in this case, it worked. The putty was put in the bottle months before. Because of the effects of oil staining sails, I have greatly increased the lead time between setting the putty in and finally bottling the ship. In spite of this lead time, the slight contact with the putty surface when bottling this ship immediately doused lower starboard sails with oil. This may eventually become lighter, but the effected area will always be more translucent than the rest of the sails. It may also spread, though I have rarely seen this with square rigged sails. I first encountered this problem years ago when the late George Pinter from Halifax, Mass, recommended I use plumber’s putty instead of the glazing putty I had been using. It took color well and was easy to shape into the bottle. Unfortunately, the heavy oil content of the plumber’s putty began to stain the sails like this. It also is supposed to never harden completely, and when the putty sea in a bottle I shipped to a gentleman in Texas became detached en route, that was it for me, and I returned to glazing putty. Sadly, this oil staining has returned in the past couple of years, and I need to solve this. Otherwise, this particular model was especially satisfying. We all have early dreams and visions that inspired us to take on this kind of work. For many of us, these are now many years old. This model does not succeed in many ways, and has a number of details that could have been, and should have been better. But it also succeeds enough in fulfilling early inspirations of mine to be encouraging, and give me hope there may well be similarly rewarding models in the future.


 1 point
 -
MiniSIB - Koch - Russian polar ship, 1/1000
Landlubber Mike reacted to DSiemens for a topic
Excellent work. The bottles you find are very unique. Makes the sib that much more interesting.1 point -

neue Buddelschiffe
Landlubber Mike reacted to Roger for a topic
Buddelschiff Ausflugschiffe in Ulm an der Donau Schiffswerft in Hamburg um 1870

.jpg.f101338ab46061cc91135352a4a80d07.jpg)
.jpg.993c4e6a3fc6cc2b58f160b4803fa414.jpg) 1 point
1 point -

Thread Grabber
Landlubber Mike reacted to exwafoo for a topic
All, I mentioned under the 'Archibald Russell' build log I had extended a multi-meter probe for use as a thread grabber in the bottle. PDF of the method attached. Sorry some of the phots are blurred a bit. best Alan Thread gripper.pdf1 point -
MiniSIB - Typical boat of Mediterranean Sea, 1/200
Landlubber Mike reacted to IgorSky for a topic
Then me just was need to install the cork and this SIB has been completed

 1 point
 -
My first SIB: Dimond
Bernard Kelly reacted to DavidB773 for a topic
I appreciate the kind remarks, everyone! I’m adding a photo of three channels (new term for me!) that I made out of plastic. They are 2 mm wide and not glued in yet. Used plastic so I could carve a peg for a solid connection. If you notice the group of holes in the hull at the mid and aft points, how the last ones on the right are up higher… a line drawing I’m referencing for this model depicts that. This thing looks like it’s been in a few battles and it’s only a merchant ship! I want to add that the seam will not be noticed when this completed. Thank you! David 1 point
 -
Wow! I love it. That's ingenious. This could be used for taking measurements of the bottle height too.1 point
-
Hi, Igor. I wish I knew myself what species of wood I used in the masts and spars because need more! It doesn't act like pine because it very workable at the 2 mm diameter foremast. It doesn't have a grain, sands without any fuzziness, and drills cleanly. And BR to you, too! David1 point
-
Thank you, all, for the encouragement! I just posted the mast tool in another thread titled "mast handling tool". DSeimens, I'm giving and have given a *lot* of thought on how to put this all together. It exercises the mind, doesn't it? Just for discussion, I'm putting individual shroud lines in, considering the usual practice of tightening them through the plates (pardon my lack of proper terminology) on the hull sides and out the bottom of the hull. A lot of threads going on there. An idea: how's about securing them at the hull first and do the tightening at the mast instead, as a single group of lines cemented together? Have them attach at a single wire that goes through the mast with a loop on each end for each opposing shroud per mast. It would avoid drilling a weakening hole in the mast and involve only pulling on one "thread" to tighten. Of course, careful measurements outside of the bottle is to be done. Thanks, again, everyone! David1 point
-
Keep posting!1 point
-
I'd like to see that tool too! Jesse1 point
-
Well done, David! Congrats!1 point
-
My first SIB: Dimond
Bernard Kelly reacted to DSiemens for a topic
I'm very intrigued about your mast tool. That sounds very interesting. I'm also interested in how you do the rigging. Inserting the masts one by one isn't something I have a lot of experience with. I think leaving the sails off is a great idea especially for a first ship. From old ships in bottles I've seen the earliest common ones in the late 19th century (Giovani Biondo bottles being an acception) didn't have sails. They became more widely used in the early 20th century around around 1915ish. There really is a beauty to rigging and leaving the sails off can bring that out. Great work so far.1 point -

Thermopylae SIB
Chasseur reacted to Bottleneck Treasures for a topic
Daniel the bottle was hand made in Poland. I use only European glass now for all my SIB's. The quality and clarity is far superior to glass made here in the United States. I find all my bottles at Marshall's Homegoods excellent prices too. All of the glass is from Poland, Austria, Czech Republic, Italy and France.1 point


.jpg.f101338ab46061cc91135352a4a80d07.jpg)
.jpg.993c4e6a3fc6cc2b58f160b4803fa414.jpg)


