JerseyCity Frankie
-
Posts
83 -
Joined
-
Last visited
-
Days Won
47


JerseyCity Frankie's Achievements
")

-
 Alvaro004 reacted to a post in a topic:
Charles W Morgan
Alvaro004 reacted to a post in a topic:
Charles W Morgan
-
Moab reacted to a post in a topic:
Multiple S.I.B. models of the ship Wavertree
-
tazam0827 reacted to a post in a topic:
HMS Ramillies, 74
-
Landlubber Mike reacted to a post in a topic:
HMS Ramillies, 74
-
JerseyCity Frankie reacted to a post in a topic:
Lifeboat COLIN ARCHER RS1 Scale 1/230
-
JerseyCity Frankie reacted to a post in a topic:
Lifeboat COLIN ARCHER RS1 Scale 1/230
-
tazam0827 reacted to a post in a topic:
What's on your workbench?
-
AuVox reacted to a post in a topic:
What's on your workbench?
-
Gwyl Blaser reacted to a post in a topic:
What's on your workbench?
-
JerseyCity Frankie reacted to a post in a topic:
James Miller 3 masted schooner
-
IgorSky reacted to a post in a topic:
HMS Ramillies, 74
-
IgorSky reacted to a post in a topic:
HMS Ramillies, 74
-
IgorSky reacted to a post in a topic:
HMS Ramillies, 74
-
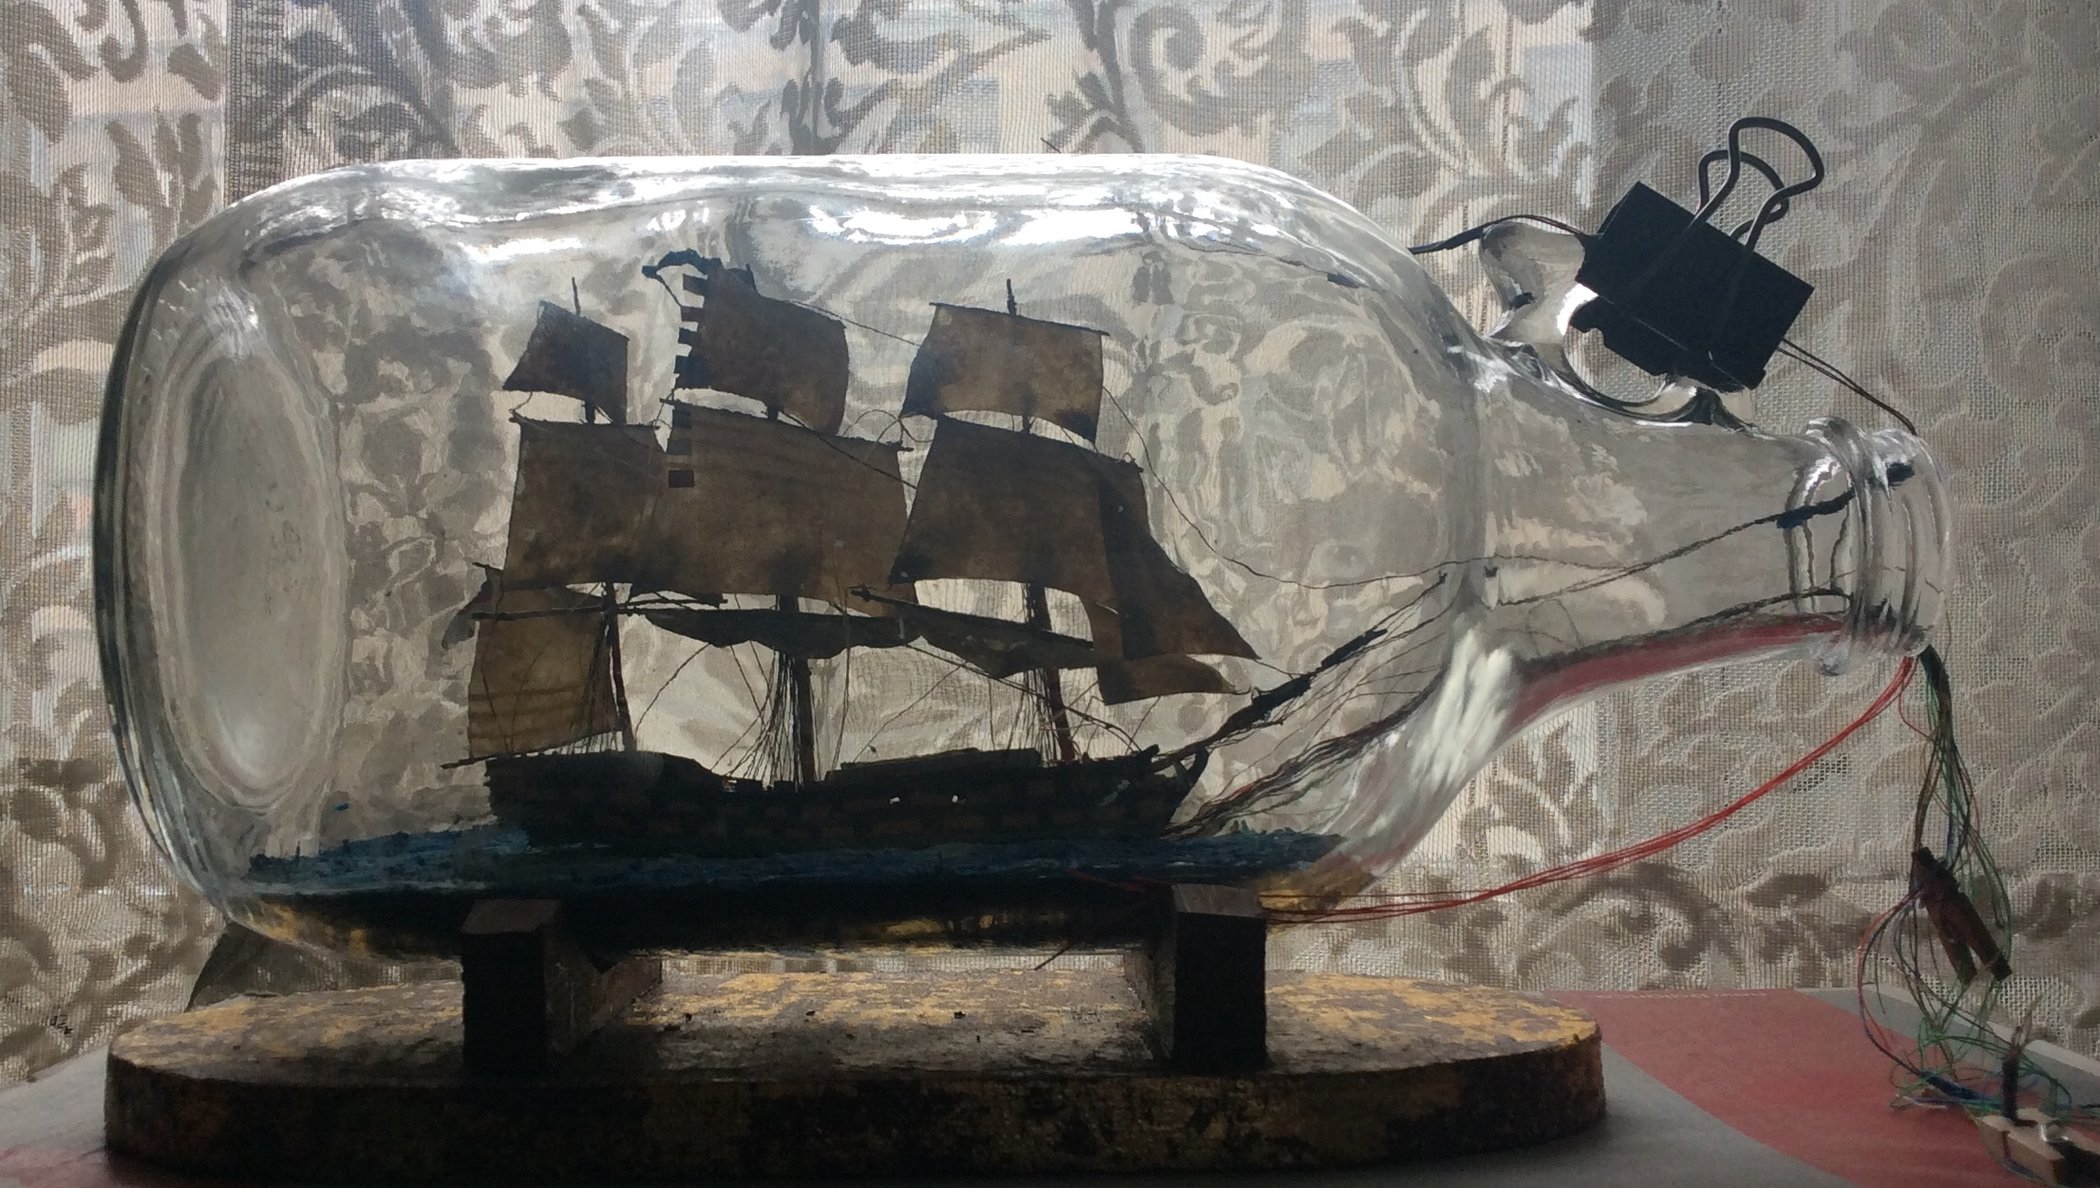
Sorry I’ve never finished this log! Truth to tell I’ve had the ship no the bottle and everything adjusted but I’ve still not nipped off the threads. When I do I’ll photograph it and post it. Meanwhile the model has already been in a few still-life paintings I’ve done.

-
JerseyCity Frankie reacted to a post in a topic:
Gypsy Moth IV
-
I got Ramillies into the bottle this morning! Whew. It’s late October. In fact it’s the anniversary of the Battle of Trafalgar today here in 2018 ! You will recall that HMS Ramillies commander at the Battle of Stonington was a very significant figure at Trafalgar so I’m very pleased I got her into the bottle on this day. I’m too cheap to turn my heat on yet so this means my plasticine sea is not amenable to grabbing onto the models hull. So I’ve not reached the end of the project but this is a good point to stop and photograph and post. Happy Trafalgar Day everyone.


-
I’ve used the outside curvature of a ceramic bowl, that works pretty good. Let’s be honest: Flat sails look fine, there’s some amazing models with sails that look great but are flat. M other SIB. Model I’m now working on has flat sails! Putting curvature into the sails is a lot of work. But I’m obsessed with curved sails.
-

What's on your workbench?
JerseyCity Frankie replied to Gwyl Blaser's topic in General Ships In Bottles Discussion
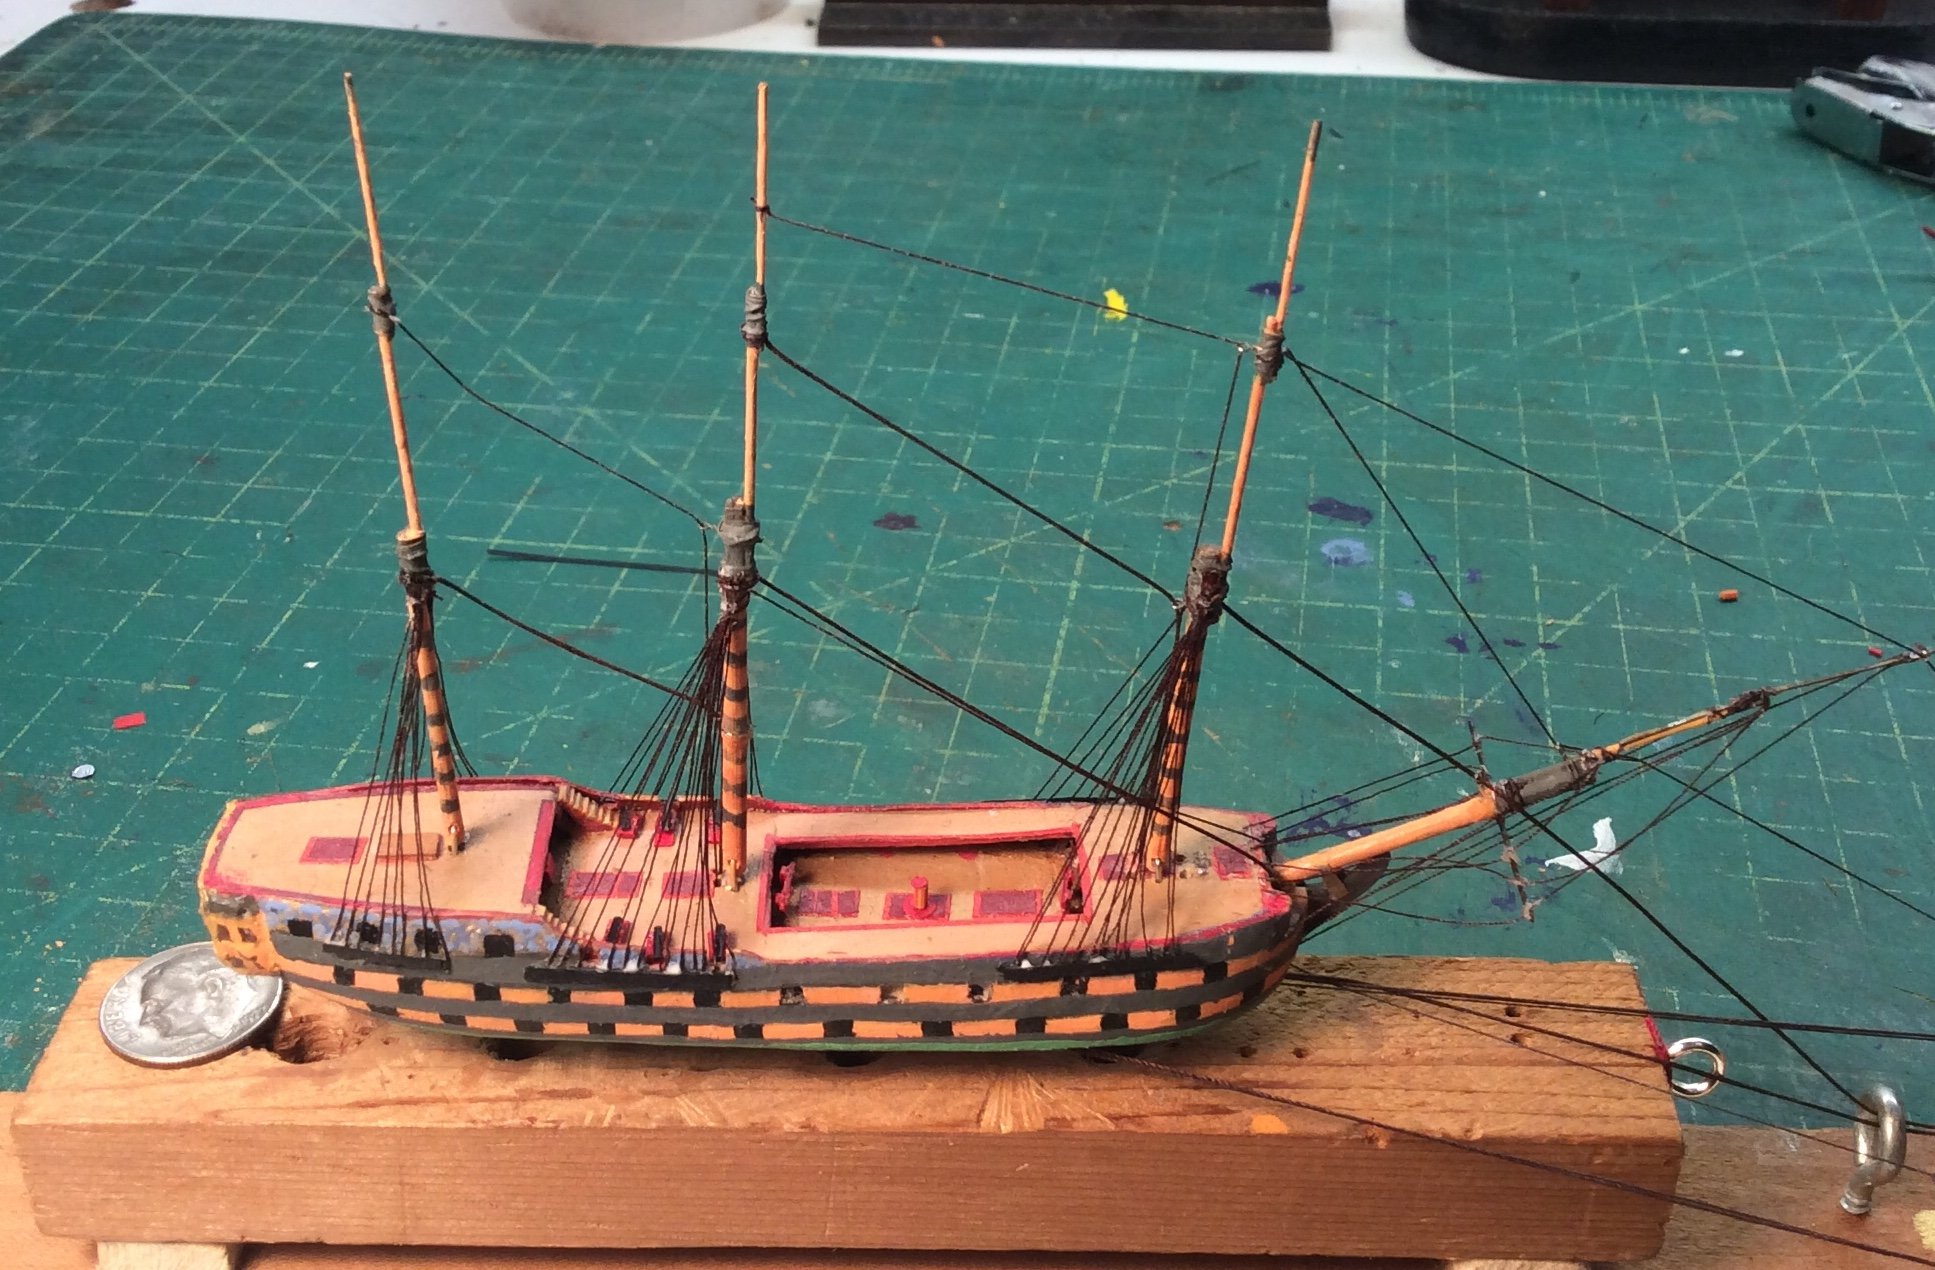
I’m doing two SIBs at once. One is HMS Ramillies and I’ve got a build log going for her here on BSB. But the second one has no build log, it’s a three masted barkentine with no name and here is her photo. I’m enjoying doing two ships at the same time since some aspects of the project can be done simultaneously and thus are more efficient- like melting and pouring the plasticine sea material. Otherwise it’s good to be able to turn away from one project as it gets stale and go to the other project the following day, alternating. The square rigged warship is done but not inserted and I’ve got half the sails yet to bend on to the barkentine.they should both be complete within a week. Then you likely won’t see me on this website for a while as I will return to my larger, static, not SIB Model Shipways Brig Niagara. So you see in the bigger picture of my modeling life I am also alternating between projects: I built the Niagara to the point of completing the hull and deck furniture and stopped to do these two SIBmodels and when they are complete I will return to Niagara to begin spars and rigging, which will take a long time. Alternating between project helps me to stay enthusiastic about each and not become bored with either.

- 349 replies
-
- 12
-
-
JerseyCity Frankie reacted to a post in a topic:
What's on your workbench?
-
JerseyCity Frankie reacted to a post in a topic:
What's on your workbench?
-
JerseyCity Frankie reacted to a post in a topic:
What's on your workbench?
-
JerseyCity Frankie reacted to a post in a topic:
HMS Gannet
-
JerseyCity Frankie reacted to a post in a topic:
HMS Gannet
-
JerseyCity Frankie reacted to a post in a topic:
HMS Gannet
-
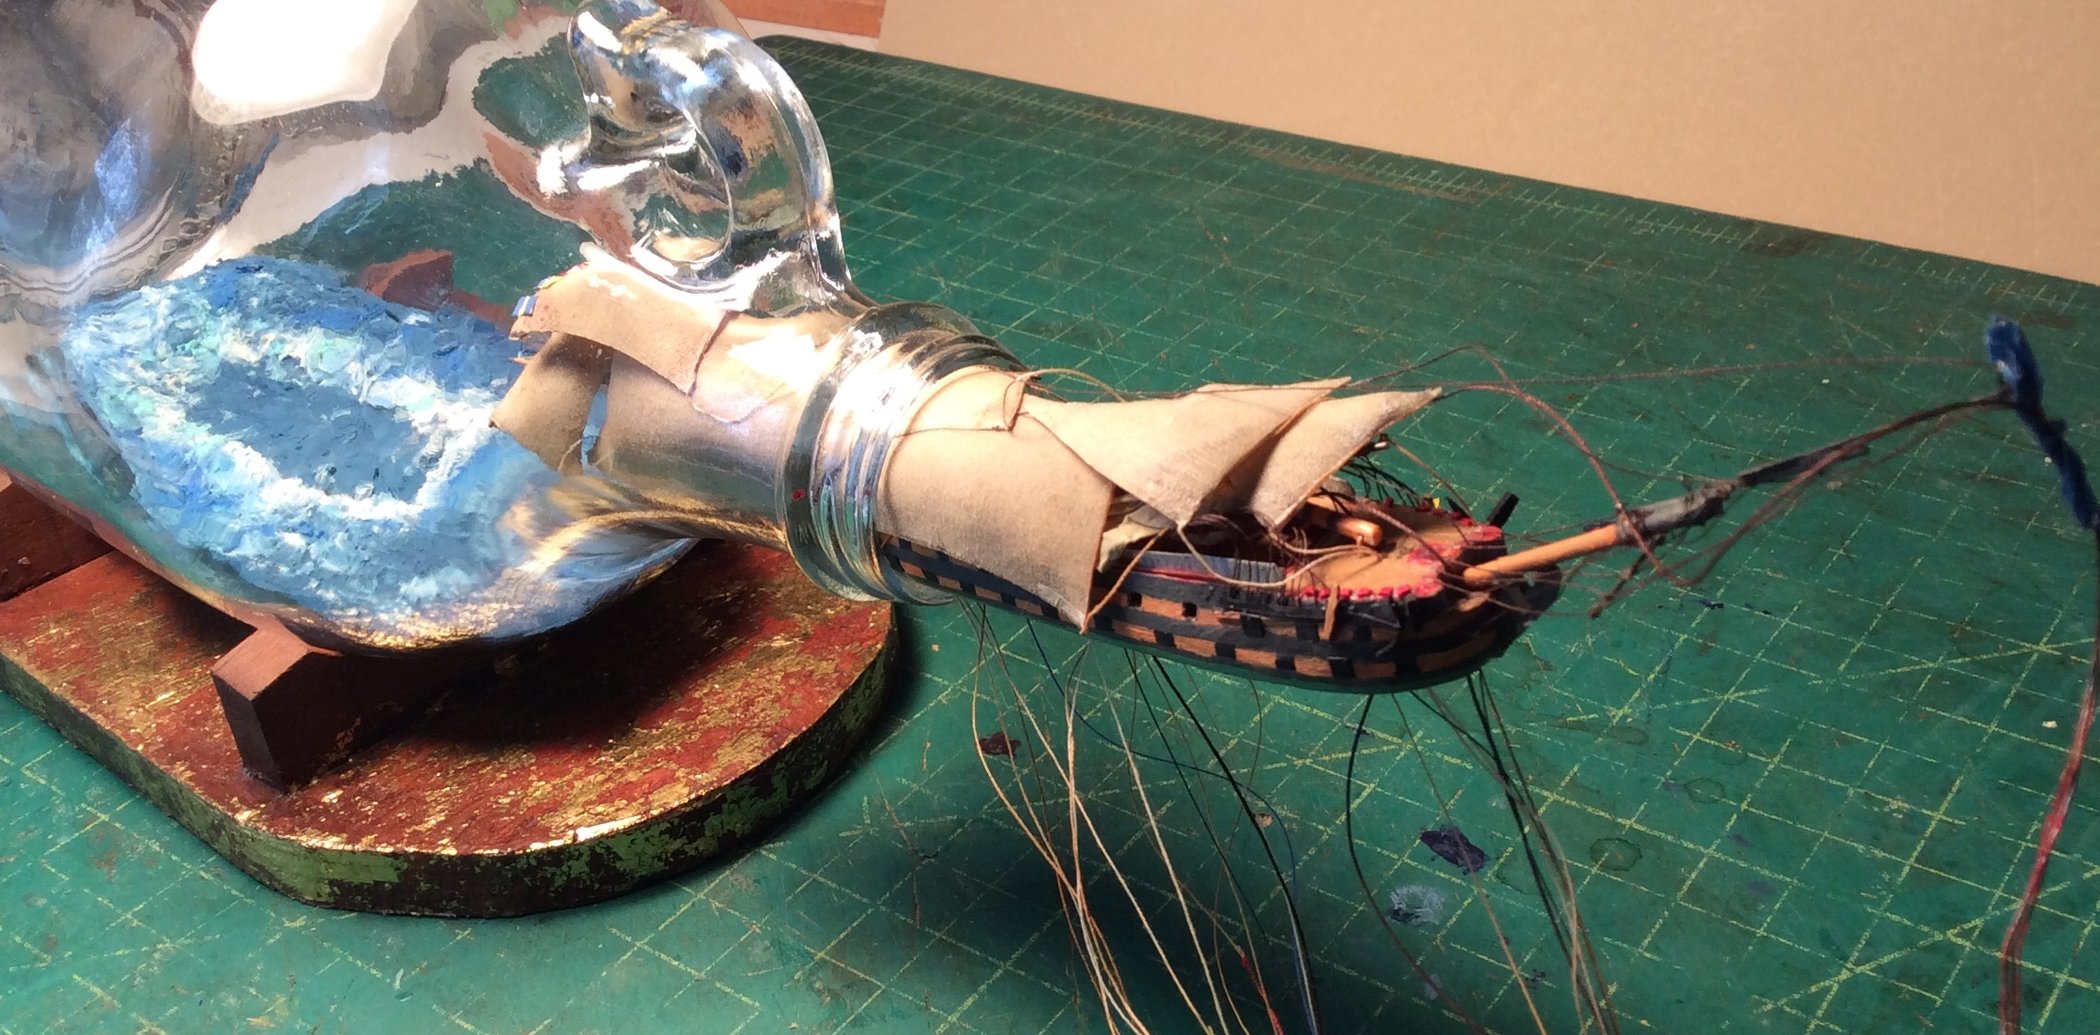
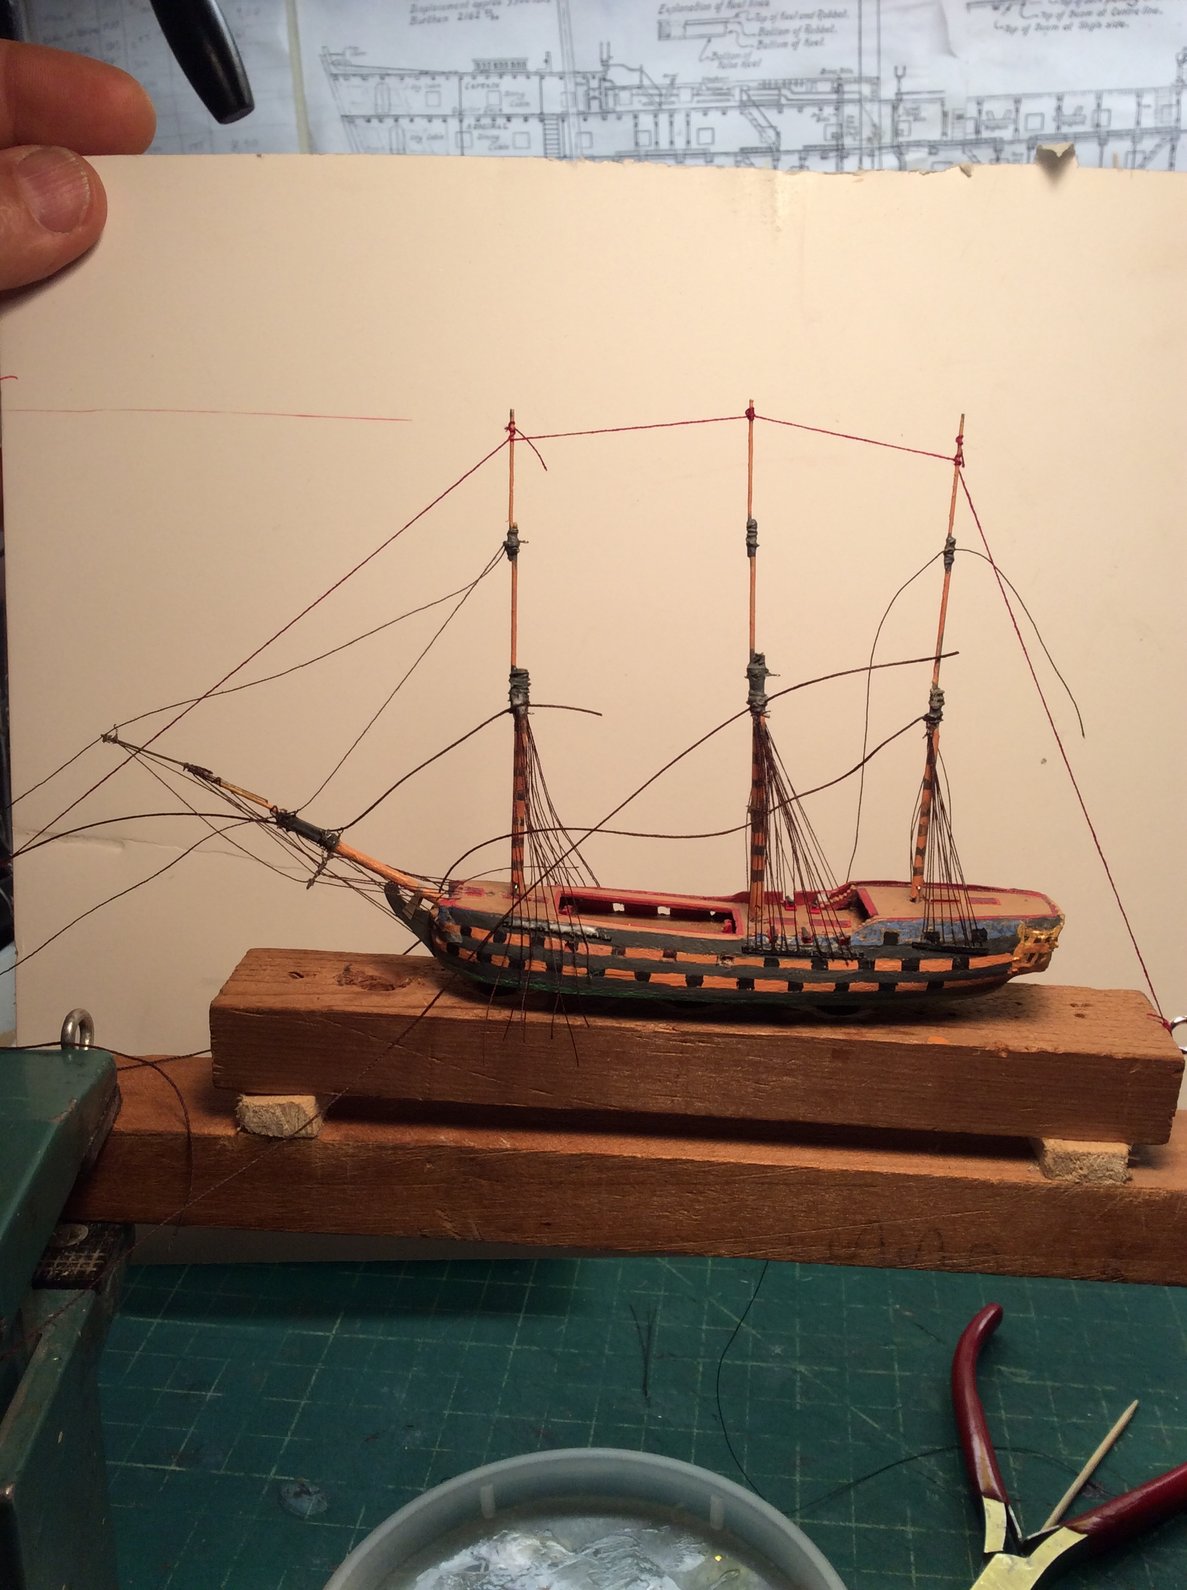
Today was PERFECT for working indoors on a ship model: cold and rainy outside and a Saturday! I was happy as a clam working on the Ramillies. I had all day to rig the rest of the sails but first I did a single test fitting into the bottle with the topsails on. It want in fine, got the masts up, etc, but I do worry that getting it back out could be an issue so I won’t do any further test fittings. The yards are wider than the bottle opening so the yards all have to cockbill up and all the clews swing away from their positions and these can foul on the stays. On my test fitting the Mizzen Topsail didn’t want to cooperate and I had a moment of panic wondering if I was going to break something getting the aft end of the ship out. I got the Tgallents and headsails on. My sail plan called for three staysails but I’ve abandoned those sails as they will add a great deal of complexity. As it stands now I’ve got twenty two control lines and I’ve been doing my best to label and color code them but it’s getting hairy. Not having three more sheets from the staysails is better for me. one thing I’ve noticed is that it’s possible to gang together groups of stays from the same Mast and bundle those lines together with blue tape nipers where they exit the inside of the bottle. I’ve never done this before, assuming they would all need to run individually. But I find they can all run identically and the tendency to snarl and tangle is dramatically reduced. I made up signal flags a pennant and an ensign. Flags on ships in bottles are ridiculously easy to make and they just glue on. They add a lot of color and visual texture to the rig plus they are a normal part of every real world ship so why not include them?


-
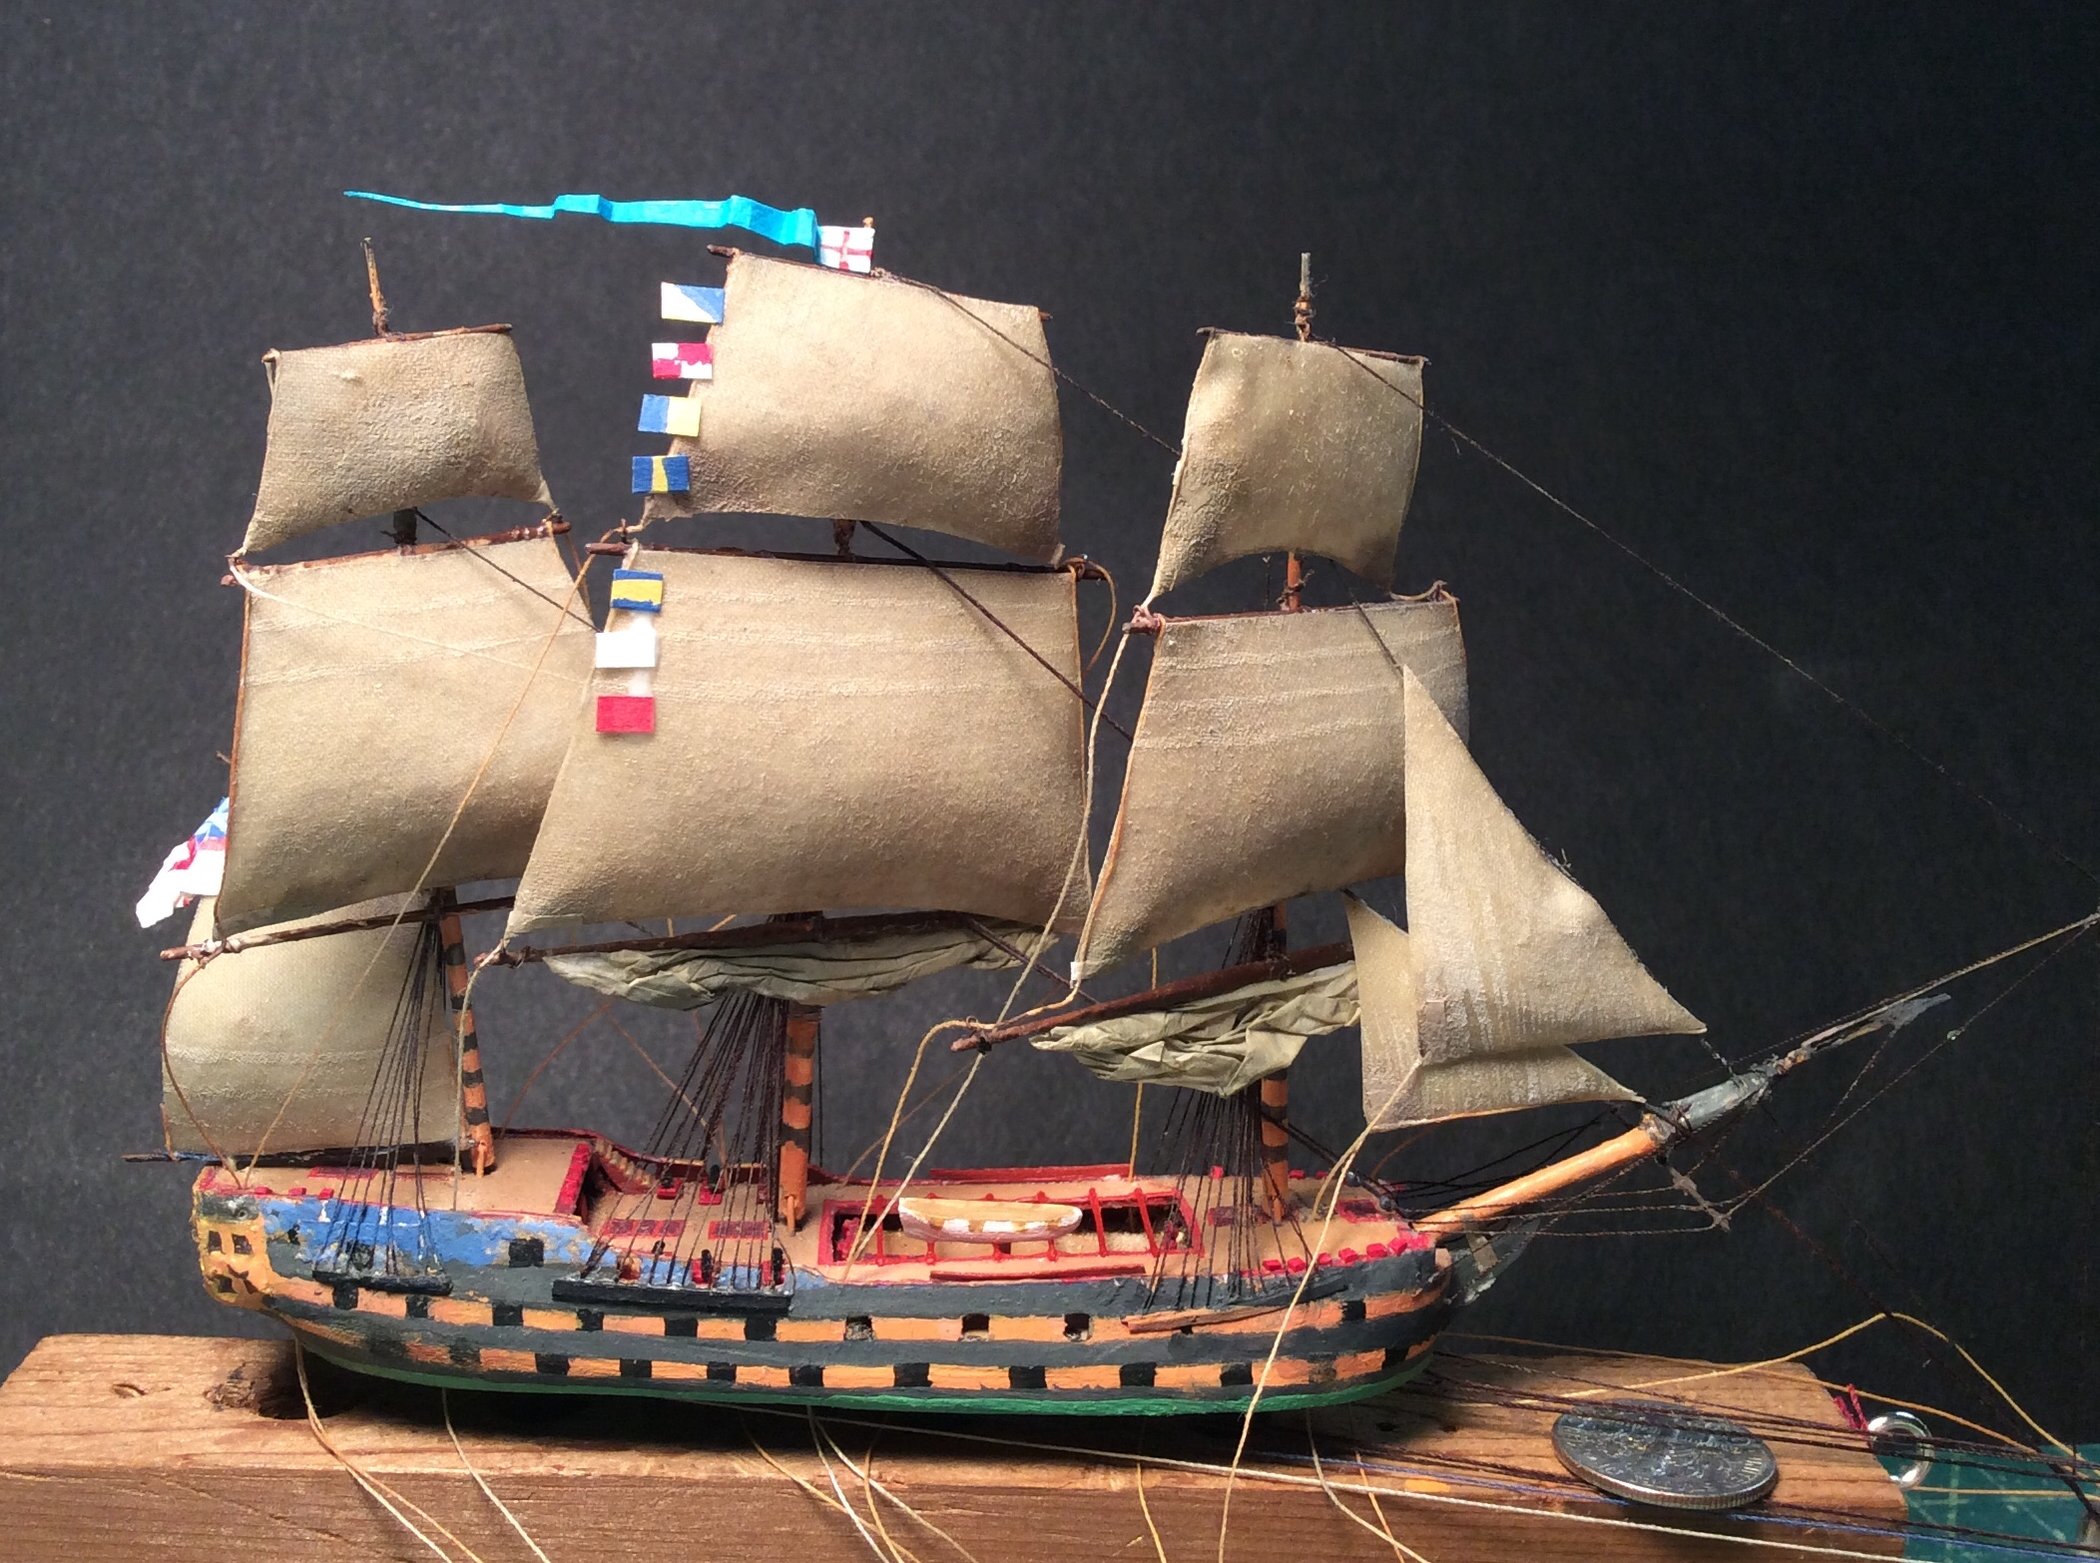
Thanks guys, praise from the praiseworthy is worth all reward! I was unhappy with the rake of the masts so I softened the white glue holding the channels to the hull on the Fore and the Mizzen using rubbing alcohol. I wasn’t sure it would be possible but it litteraly softened the glue faster than it takes to write this paragraph. Then I reglued and I’m much happier now. tonight I put on the topsails. I ALWAYS depict square sails braced hard over, I think it looks more exciting. Even if I was going to build a ship bare-polled, I’d probably still brace up the yards.


- 34 replies
-
- 10
-
-
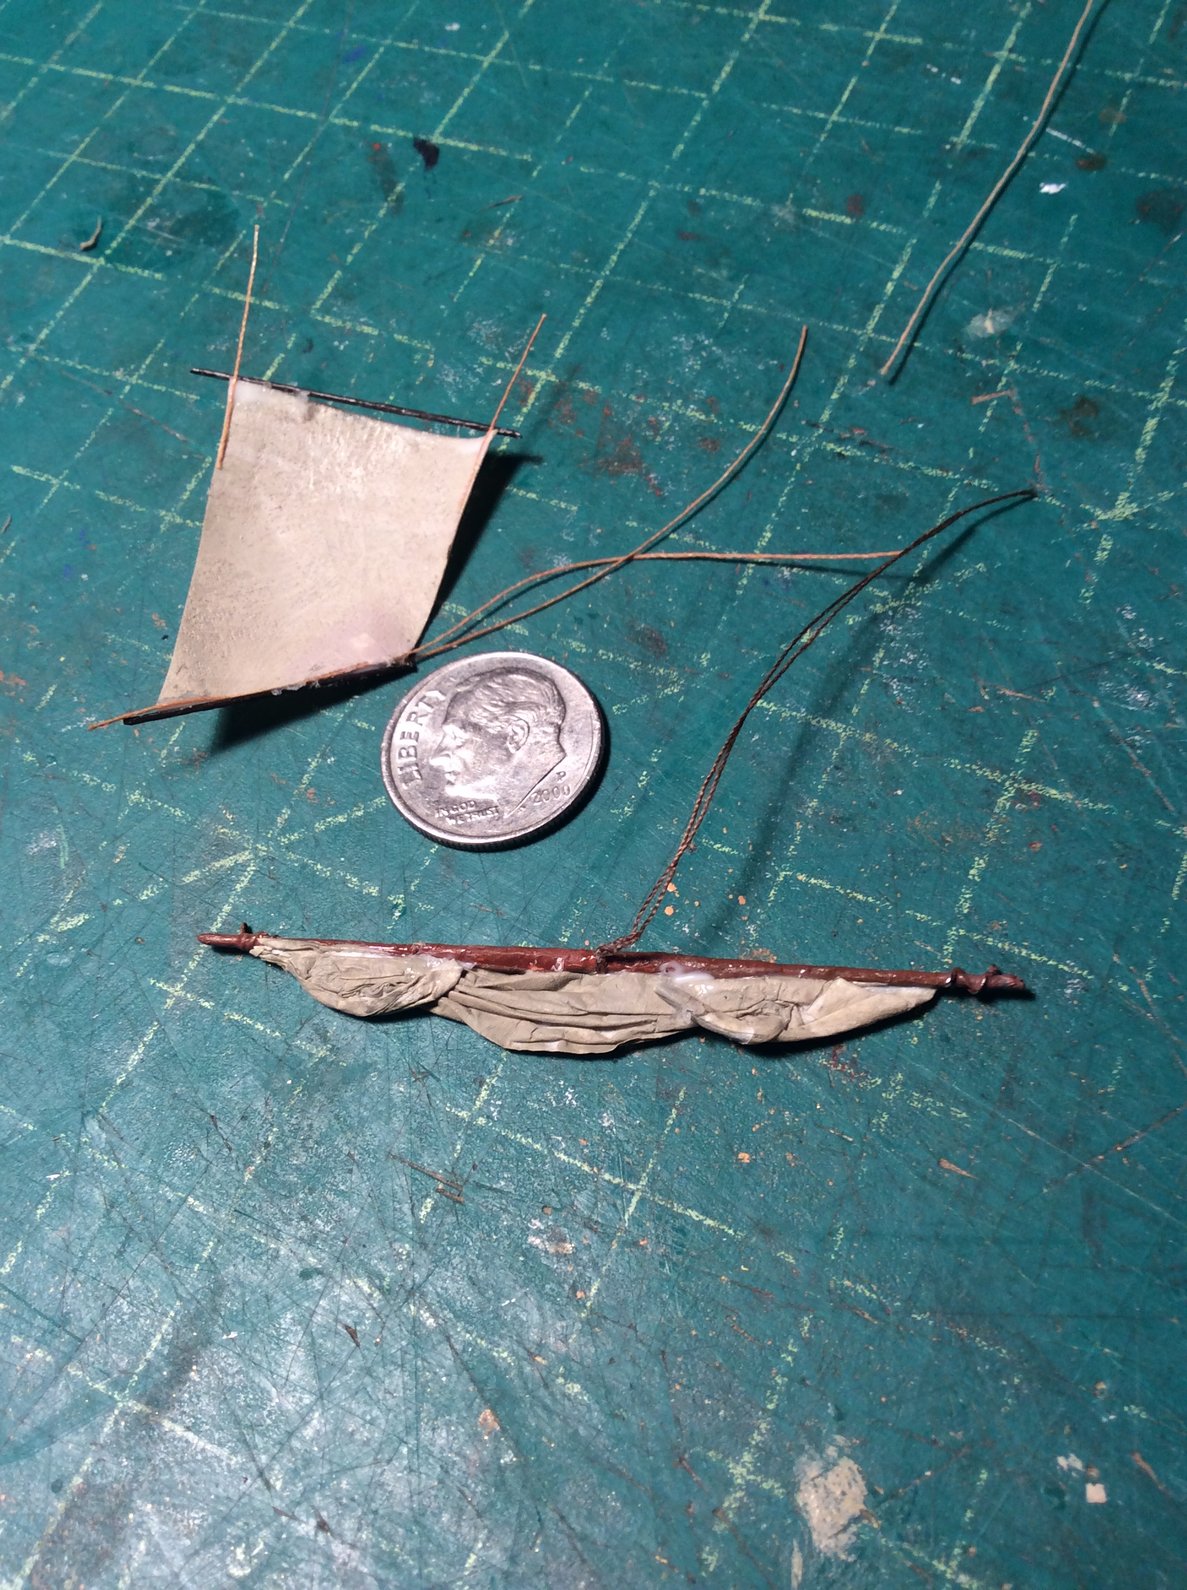
Finally bending on sail. The furled courses are tissue paper painted a color close to the other sails. The Spanker is attached only at the point of the gaff jaws to the Mast, the bottom of the sail can flop away from the deck and be drawn in tight later inside the bottle via the sheet and tack. It feels great to be bending the sails on, I’m excited again.


-
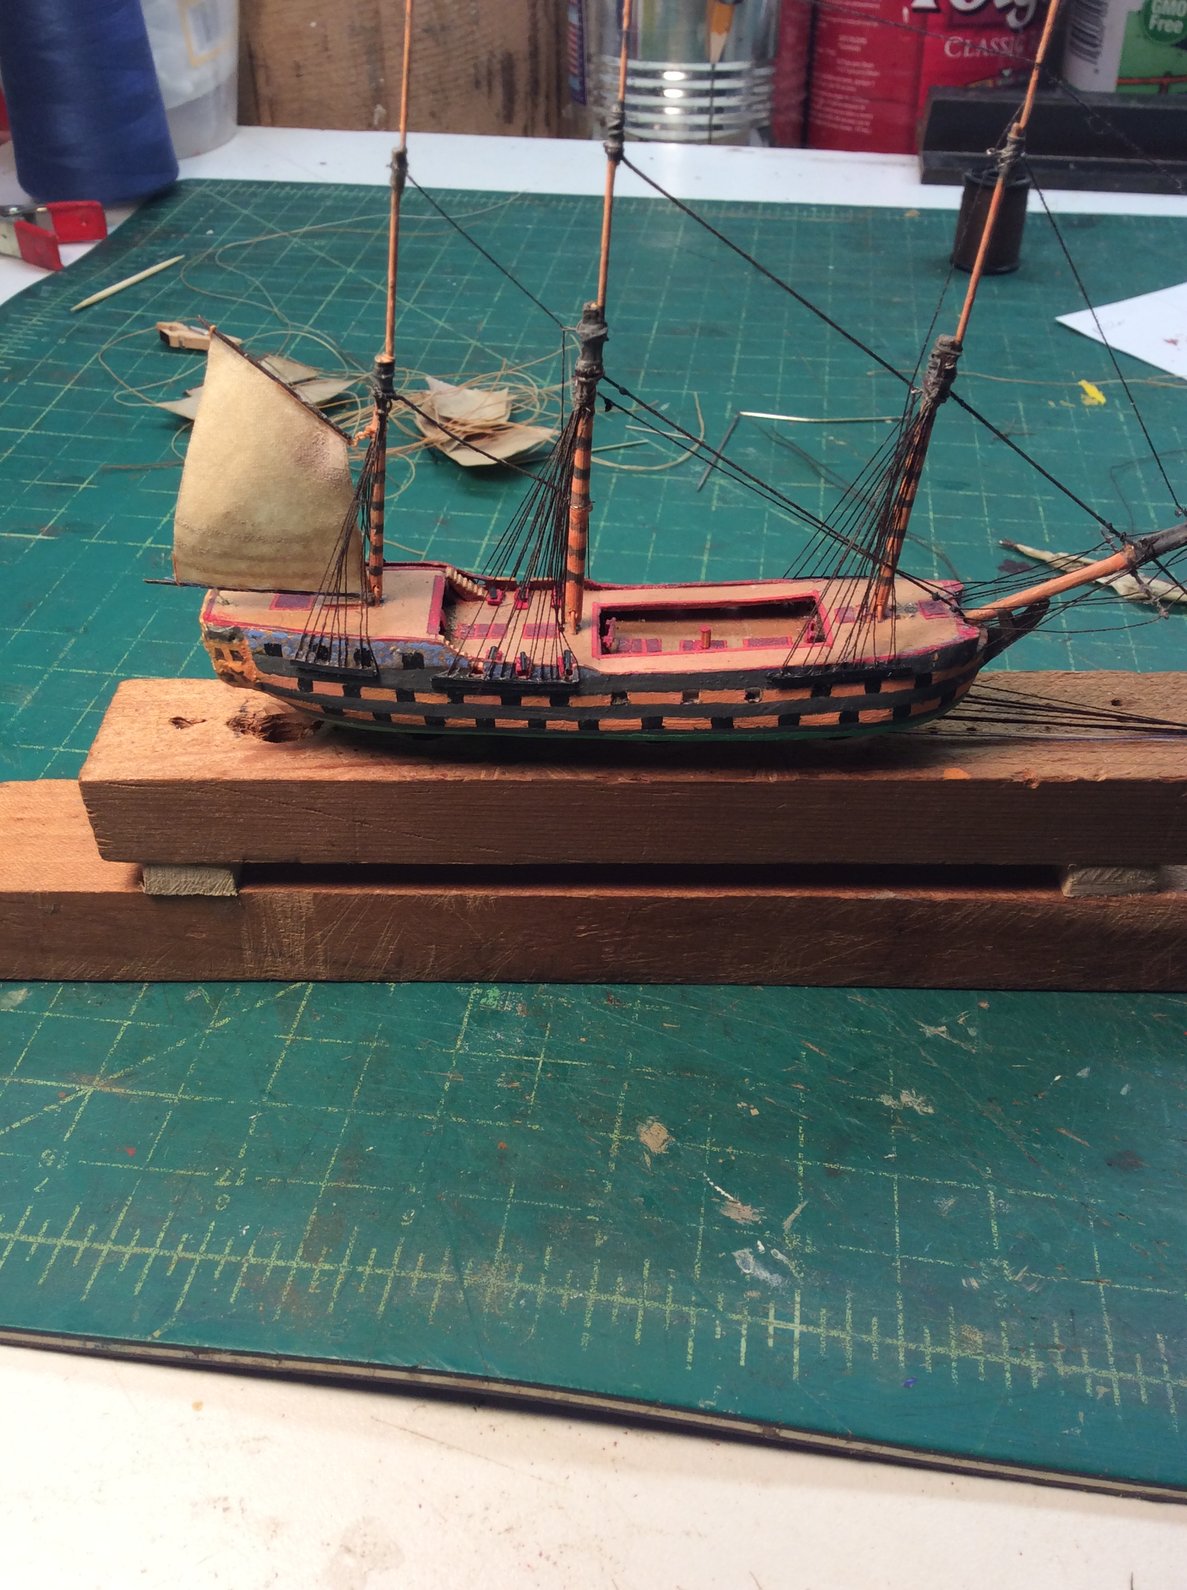
Yards are painted piano wire with wire loop eyes at their arms to take the sheets of the square sails. My intention is to make the Sheets then double as Braces and in this way I hope to uprig inside the bottle. Each yard has a thread parel which I will use to tie each spar to its place on the Mast. I’m debating adding Lifts but feel they just multiply the complexity.

-
Thread/ Running Rigging. It’s khaki thread stained with a little thin acrylic Raw Ocher. Nearly every thread visible here is a Sheet. In each case I glue the thread along one entire edge of a sail, so it’s as well anchored to the sail as possible, then I fold a tiny piece of tissue paper over the thread at the point where it emerges from the sail. Then I paint the sail at that point to disguise it all and further cement it together. I leave an inch of thread protruding above the heads of the sails too. This portion will be folded over the yard the sail will be glued to, then glued back onto the sail again to assure the sail is firmly anchored to the yard.

-
Cut out and taped to a card, now you can see the curved shape. I realize there’s a mistake visible in my photos above: the topsails are mislabeled Courses. I intend to have the courses furled and I won’t use the fabric/epoxy methods for that, probably tissue paper.

-
After curing overnight the epoxy is fully set. I trace the outline of the sail onto the fabric and pop the sails off the forms. The fabric is stiff but has a slight elasticity and flexibility to it, it’s not a brittle shell. But it is now frozen into this 3-D shape and no amount of effort will flatten the fabric again. The side of the fabric facing the form is as shiny as glass and must be roughed up with sandpaper to remove the gloss.


-
After rough sanding I paint on a second coat of a thinner mixture of the Water Putty, to try to smooth the surface further. When dry I sealed all the sail-forms with nail polish. my technique is to impregnate woven fabric with transparent Five Minute Two Part Epoxy, then stretch the wet fabric over the forms, pin it in place, and allow to harden. I put a piece of Seran-Wrap over each form as a resist. On a sheet of glass I squeegee the transparent epoxy into lengths of the fabric. I flip the fabric over and repeat the process as I want to get the epoxy deep into the fibers of the fabric. the fabric I chose is NOT white but actually a cream color, as can be seen in one of the photos a blank white 3x5 card shows the fabric is a darker and more off-white color. Actual woven fabric sails are never pure bright white and in fact get darker as they age. The epoxy will harden in five minutes but I I’ll leave the sails stretched over the forms overnight to be sure they are fully cured and hardened. Until now all my ships in bottles have had much simpler paper sails, this is my first time using actual woven fabric in a bottle. Paper wouldn’t stretch over the forms properly. Years ago I used this technique with tissue paper, in multiple layers as with water based glue, and this gave good enough results but I like the strength of a woven fabric. I chose the thinnest fabric I could find. With the epoxy and then some subsequent painting, I doubt the weave of the fabric will be noticeable, and I don’t want it to be visible. As I said before, this technique of forming the sails over 3-D forms is one I use on larger non-bottle models. It’s a LOT of work and adds a great deal more time to the build. But I love the look of sails that are bellied out realistically in three dimensions and other easier techniques I have tried don’t work as well. I do worry that these thicker stiffer sails are not going to easily pass through the bottle neck though!


-
This mix-it-yourself water based putty-like product is, I think, the least expensive item for sale at the huge American hardware chain Home Depot. Under $4! What else can you buy today for less than $4.? And it’s a terrific product. Its a beige powder you mix with water that dries to a very hard consistency. After which it can be sawn filed or sanded. It’s hardness is the only drawback, I wish it was slightly less hard when cured. Anyway, you can see what I’m doing with it: 3-D forms for the sails.


-
Templates for sails. I’m scaling down a sail shaping technique I use on bigger not-bottle models. Every other ship in bottle I’ve made has had simple paper sails, sails which I curl slightly to give the appearance of wind bellying the sails out.

-
Standing rigging complete!